


Kubernetes, also known as K8s, seems to be getting quite some attention these days in the container orchestration world. It even got some attention from Docker Inc. itself a while back, despite the fact that they have their own container management tool called Docker Swarm (and it’s as good as Kunernetes, I’ve been told). BTW, check our guide on getting rid of Docker Ports with Traefik.
Both K8s and Swarm are container management tools: tools for running and orchestrating containers in a cluster of serves. In this article, I’ll explain what Kubernetes is and cover some of the basics while we run a Laravel application with Redis and MySQL.
By the end of this article, you will have a basic understanding of what K8s is, what problems it solves, and how to run a multi-container PHP application (Laravel framework) making use of MySQL, Redis, workers, and schedulers.
Lingo
When we are learning new tools, I find that one of the most important parts is learning the lingo first. Once everyone is speaking the same language, things get easier. It’s no different with K8s. Let’s start by discussing some of the concepts we are going to use, then we will use these concepts to deploy a real application.
First and foremost, we are going to talk about something called Kubenetes Objects. You can think of an Object as a “manifest” of your intent, usually written in YAML. There are different types of Objects, so let’s cover some of them.
POD
The POD is the smallest object in K8s. It consists of 1 or more containers.
In K8s, you will run PODs, grouping them using labels. Ah, yes, we use lots of labels in K8s land. They are used to link many different pieces together.
Each POD in a K8s cluster gets its own internal IP. If you are trying to interact with other PODs in the same cluster, it gets tricky because PODs are meant to be ephemeral (just like containers), which means that a POD can halt and catch fire, but the K8s cluster will spin-up a new one to replace the faulty one and make sure the application is still running in your desired state – not automatically though; we will see more about it in a moment.
As you may have guessed, once that happens, each POD will get its own IP address and if you configured a POD to interact with another POD via their IP, you are going to get a lot of errors. Services to the rescue.
Services
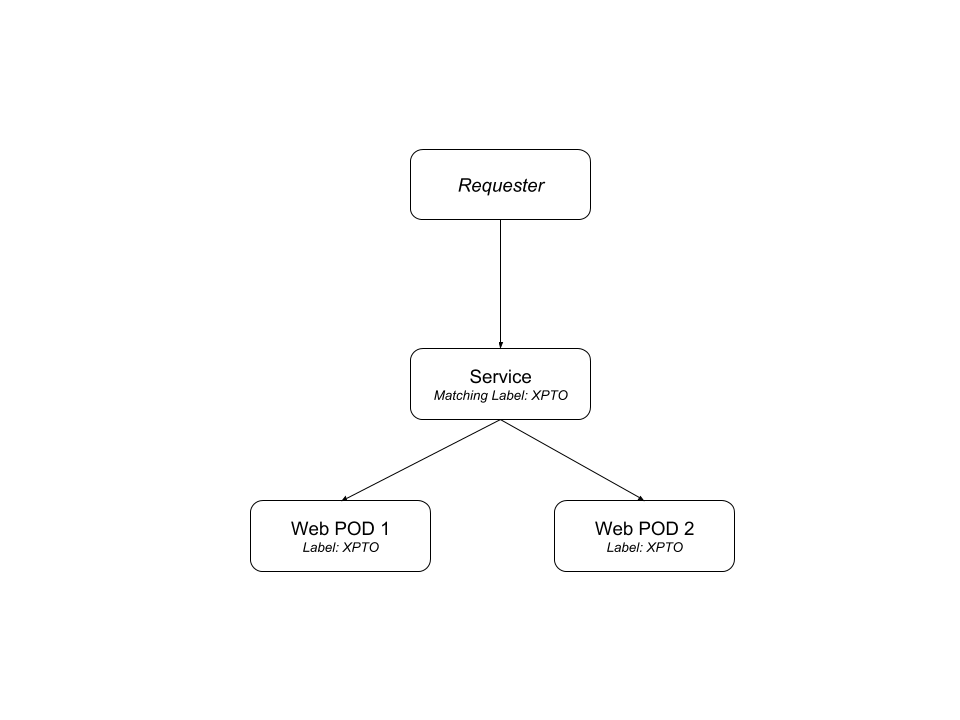
You can label your PODs and create a Service in K8s that will work as an internal load balancer between your PODs. Instead of pointing to the POD directly, you point to the service.
The service “knows” which POD to send the request to via the labels. This makes scaling and even rolling out new versions of PODs a real breeze, as the Service will keep listening for new PODs using the labels you configured and will remove the deleted ones from its list automatically.
Services are also really important when you are running K8s in the cloud. With Google Kubernetes Engine (GKE), you can bind an external load balancer to your services and expose POD endpoints to the outside world. We will talk about running K8s in the clouds soon, but it’s similar to running it locally but not without a couple tweaks.
You can read more about PODs and their lifecycles in the documentation. Running a POD is a tedious task. If you want to run multiple PODs of the same kind in parallel, it gets boring repetitive and a bit error-prone. Of course we can automate it.
Replication Controllers
Now that we have our PODs behind a Service, it’s time for us to handle scaling PODs. We will use Replication Controllers for that. Often called an “RC”, they are also another type of Kubernetes Object. You give it a POD template, the desired amount of replicas of this same POD, and it will make sure that there is always this amount of replicas running in the cluster.
Notice that in K8s we only configure the desired state and K8s will make sure that the system has whatever we defined in there. This means that K8s is declarative. You tell it what is the desired state of the cluster, and it will make sure the system matches, which means spinning up some more PODs or terminating existing ones to match your desired set of replicas.
For example, let’s say that at some point you notice your queue size increasing and the current amount of workers are not enough for handling it. You can scale it up by increasing the desired replicas number and the new workers will show up to help to handle the jobs.
It’s recommended in the docs that even if you only intend to run a single POD, you should still be using at least one replication controller. This will make sure that whenever your POD crashes for any reason, K8s will spin up a new one to replace it (see “How a ReplicationController Works“).
Deployments
Another way of handling scaling PODs is via the Deployment Object. This is a special kind of object. Using this type of replication, you also have rolling updates of the POD container versions out-of-the-box. This is what we will use for our own application below.
Every time the application code changes, a new version of your application container will be built, and then we are going to update our Deployment manifest with the new version and tell K8s to apply the changes.
K8s will then handle the rolling-out of this newer version, it will start terminating PODs with the old version as it spins up the new PODs with the updated container. This means that at some point we will have multiple versions of the same application running at the same time. We need to have that into account when we are coding, but that’s common for cloud-ready applications these days.
StatefulSets, Volumes, and Claims
In the container world you might have heard about things that are ephemeral. This means that containers cannot rely on the state, be it the filesystem, or memory, or whatever.
This allows for incredible scalability which is ideal for application containers. However, there are some services that do require some kind of state to be persisted like a Redis container or a MySQL container, for example. The whole purpose of these services is to hold state. Luckily for us, this is an already solved issue in the container world, at least for file-systems: we have volumes.
K8s provides you with a specific kind of object for that, it’s called StatefulSet. You can create a volume in the K8s cluster and allocate it to a StatefulSet so you can keep the files in that volume even if that container crashes or when you update its image.
Volumes in K8s have a defined lifetime, different than the Docker volumes. In K8s, they outlive the POD’s lifetime. This means they will keep existing throughout container restarts or updates inside this POD, and they will cease to exist when these PODs are gone. Something to keep in mind.
Although we are going to demo using PersistentVolumes here, I would not recommend it in production. Check the Conclusion section to know more about why.
The Architecture
Now that we have a better understanding of the pieces we are going to use, let’s talk a bit about the anatomy of a K8s cluster.
A K8s cluster consists of a master and nodes.
The Master
In K8s world, a master consists of many small pieces. These pieces run together on the same server. Usually, the master server doesn’t run any POD on its own server. Instead, PODs run inside the node servers — the only task of the master server is to manage these nodes and decide where new PODs will run.
The main master part is called: the api-server. This is the part we use to interact with the K8s cluster. It’s a REST API that uses JSON format. We declare the desired state of our app (services that will run, and other configuration) in manifest files, and we send these manifest files to the K8s cluster using this REST API on the master server. The master will validate the manifest and, if everything is fine with it, it will save it in another piece of the master node: etcd.
etcd is a NoSQL key-value store that is as powerful as it’s simple. The desired state of the cluster will be stored here. In other words, etcd will be the single source of truth of our cluster.
Another important piece of K8s architecture is the Controller Manager. This consists of a bunch of “controller” applications that keep watching the etcd and ensures that everything is consistent. This means that when changes are made to the desired state, the Controller will notice, and will make the changes in our Cluster to make sure that everything matches.
The missing piece now is The Scheduler. To put it simply, this object is responsible for handling new pods and assigning these to nodes.
It’s important to note that the only piece that we can directly interact with here is the api-server. And we do so using the kubectl, a CLI tool to send commands to the K8s cluster. This CLI tool will talk to the api-server and things will kick in from there.
Nodes
From the docs:
The Kubernetes node has the services necessary to run application containers and be managed from the master systems.Kubernetes Design and Architecture
There are three pieces in a node:
- the Kubelet;
- the container runtime; and
- the kube-proxy.
The Kubelet is a K8s agent (daemon) that runs on each node. It registers the node in the K8s cluster and watches for commands from the master, such as PODs instantiation. If for whatever reason the node fails to run the master commands, it reports back to the master saying the node can’t run the assignment and the master decides what to do next.
Kubeletes work with Pods, running and/or stopping them from running. But a Pod consists of containers, so the Kubelet will communicate to the container engine in the server to pull images, run containers and so on. The container runtime is usually the Docker engine, but we are not limited here.
Last but not least: the kube-proxy. This piece manages the network inside the node. It works as a lightweight load-balancing inside the network.
Demo time!
Enough talking! Let’s get an actual application running on K8s. The application we are going to run in this demo is Slackish, a Slack clone I built a while back. It’s a simple one but has enough pieces for our demo.
First of all, we are going to create some YAML files to declare how our cluster should look like. To do so, we can create another Git private repository. We could create the files in the same Git repository as our application, but since I saw this talk, I found it easier to keep the infrastructure related files in a separate, private repository.
This enables us to add some automation to the infrastructure Git files without having machines changing files around our codebase repository. For example, You could have a CI server watching your application repository for new commits (or tags), creating new Docker containers for your application, and updating the infrastructure files with the newer container version, then sending a PR to your infrastructure repository. If saving the files in separate repositories doesn’t make any sense to you, feel free to save the files wherever you want.
Our application has a Web, Worker (Horizon), and a Scheduler container. I’m using the approach suggested in this post on Laravel News. The images are published publicly on Docker Hub so K8s will be able to pull them for deployments.
This application also makes use of Mysql for persistence and Redis for a variety of usages (such as shared caching, session, background queues).
To run K8s locally, we are going to need Minikube. It runs a single node K8s cluster in a VM, so we can easily try some concepts locally before spending some money on an actual cluster. Once you install minikube (it’s a single binary), you can run it in your terminal like so:
$ minikube status
========================================
kubectl could not be found on your path. kubectl is a requirement for using minikube
To install kubectl, please run the following:

curl -Lo kubectl https://storage.googleapis.com/kubernetes-release/release/v1.10.0/bin/linux/amd64/kubectl && chmod +x kubectl && sudo mv kubectl /usr/local/bin/

To disable this message, run the following:

minikube config set WantKubectlDownloadMsg false
========================================
minikube:
cluster:
kubectl:
Aha! It’s working, but as the output says, we need another tool, kubectl. Let’s install it following the instructions provided in the previous command output. After downloading the kubectl binary and making it available in your $PATH, let’s run the status command again:
$ minikube status
minikube:
cluster:
kubectl:
Good. No warning means progress. You should have VirtualBox installed before we can continue. Now, let’s create the VM. Run: minikube start. This will download the ISO, create the VM and configure the kubectl to point to the local K8s cluster. The first time you run it, it might take a while. Once it’s finished, you can run the status command again:
$ minikube status
minikube: Running
cluster: Running
kubectl: Correctly Configured: pointing to minikube-vm at 192.168.99.100
Great! the means our K8s single-node cluster is running and ready for us to use. Let’s access the dashboard. Open a new terminal window, because this next command will block your terminal session. In that new terminal, type:
minikube dashboard
Opening http://127.0.0.1:45741/api/v1/namespaces/kube-system/services/http:kubernetes-dashboard:/proxy/ in your default browser...
Created new window in existing browser session.
You should see a page like this one:
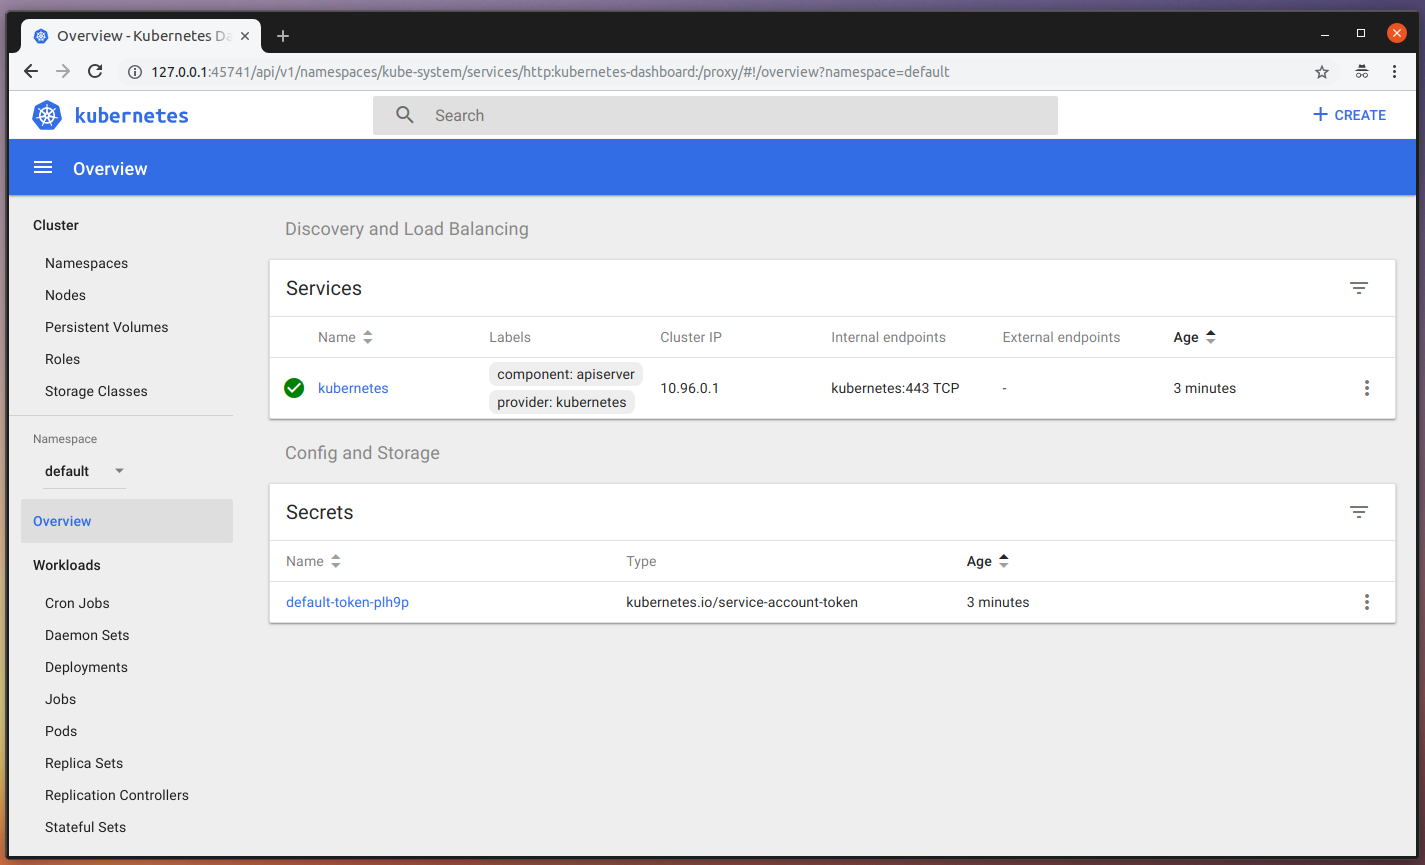
Once we start creating our PODs and service, you will be able to see the status and progress of our actions in the dashboard. Let’s start describing our application. Before we start, let’s create a namespace for our application.
This will give us a dedicated dashboard view for the tools used by the Slackish application. A namespace is another K8s piece and can also be described in Yaml files. Change directory to the Kubernetes empty git repository and let’s create our first Yaml file: the slackish-namespace-manifest.yaml, it should look like this one:
apiVersion: v1
kind: Namespace
metadata:
	name: "slackishapp"
	labels:
		name: "slackishapp"
Now, let’s used kubectl to tell K8s to create this namespace:
$ kubectl create -f slackish-namespace-manifest.yaml
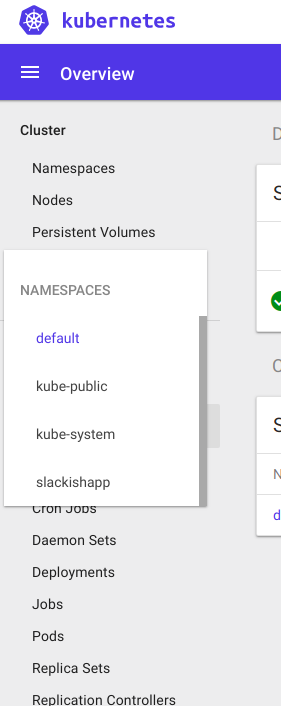
namespace "slackishapp" createdNow, you should be able to see the new namespace in the Namespaces dropdown in the sidebar of your dashboard, like this:
Choose that option from the menu, and let’s get started with the actual services. First, let’s deal with Redis. We are going to need a volume just so our Redis service can save some stuff to disk. This makes it easy for us in case it crashes since we are going to be storing queue jobs on it that our Workers might consume. Create a redis/ folder in the K8s repository, we are going to store the Redis specific YAML files there. Let’s start with the Volume, so create a volume-manifest.yaml file containing:
apiVersion: v1
kind: PersistentVolumeClaim
metadata:
  name: redis-pv-claim
  namespace: slackishapp
spec:
  accessModes:
    - ReadWriteOnce
  resources:
    requests:
      storage: 20Gi
This is describing a PersistentVolume named redis-pv-claim in the recently created slackishapp namespace. We will use it later when we describe our POD template. We can tell K8s to create the volume using the same command we used to create the namespace, but specifying this file instead, like this:
$ kubectl create -f redis/volume-manifest.yaml
persistentvolumeclaim "redis-pv-claim" created
Now, let’s create the Service that we will use as a proxy to the Redis PODs. Create a service-manifest.yaml file, also inside the redis/ folder, containing:
apiVersion: v1
kind: Service
metadata:
  name: redis-svc
  namespace: slackishapp
spec:
  ports:
  - port: 6379
    protocol: TCP
  selector:
    name: redis
This is describing the service we want, the port to watch, which protocol it speaks, and the matching selectors. This is the important piece here. K8s will use the selectors you define here to proxy the network calls to the correct PODs that match this label. Create the service also using the kubectl create command:
$ kubectl create -f redis/service-manifest.yaml
service "redis-svc" created
Now, let’s create a StatefulSet for our Redis POD. Create a file statefulset-manifest.yaml containing:
apiVersion: apps/v1beta1
kind: StatefulSet
metadata:
  name: redis-st
  namespace: slackishapp
spec:
  serviceName: redis-svc
  template:
    metadata:
      name: redis
      labels:
       name: redis
      namespace: slackishapp
    spec:
      containers:
        - name: container-redis
          image: redis
          ports:
            - containerPort: 6379
          volumeMounts:
            - name: redis-persistent-storage
              mountPath: /data
      volumes:
        - name: redis-persistent-storage
          persistentVolumeClaim:
            claimName: redis-pv-claim
Quite a lot going on here. Let’s dissect it. First of all, we are defining the StatefulSet Object. Then, we are defining some meta data about the object, like the name and namespace. After that, we have some specs for it, where the first one is the label selector.
So this StatefulSet will also use labels for monitoring the PODs that are running. In this case, the same ones used by the Service, but could be different, depending on your needs.
Next, we have our POD template. It also has some metadata about the PODs, in this case only the labels the Redis PODs will use. This should match with the Service and StatefulSet defined labels. Next, we have the specs for our POD template, this should describe the Redis container we are going to use, things such as the image (which will be pulled from Docker Hub), the POD name, ports, and so on. We are also mounting the volume we created specifically for the Redis POD here.
Now, we can create the StatefulSet in K8s. All that with the same command we have been using so far:
$ kubectl create -f redis/statefulset-manifest.yaml
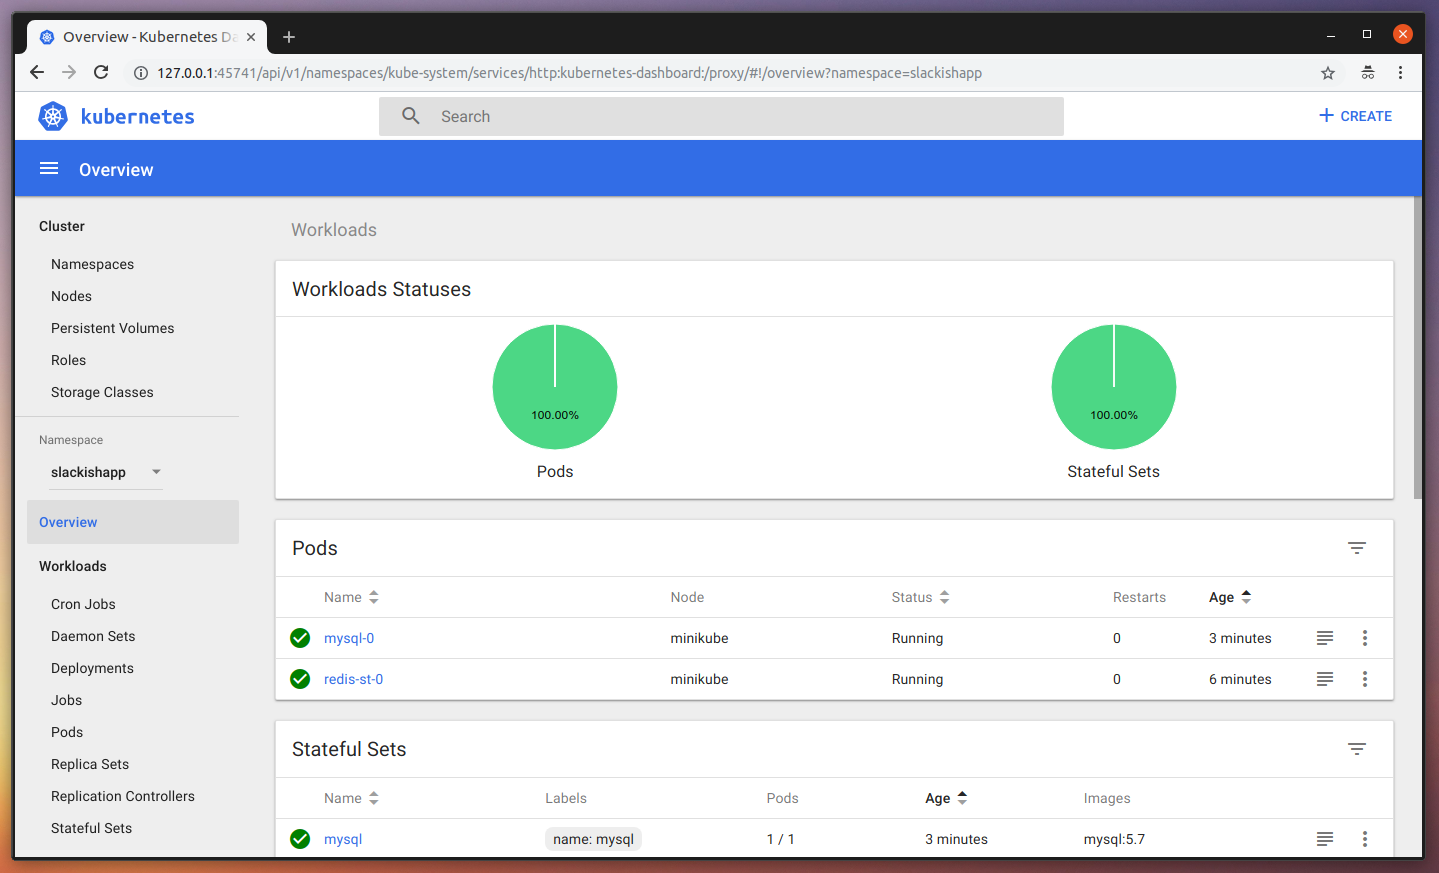
statefulset.apps "redis-st" createdAfter this one, you can go to the Dashboard and see our changes reflected there (you might need a refresh), something like this:
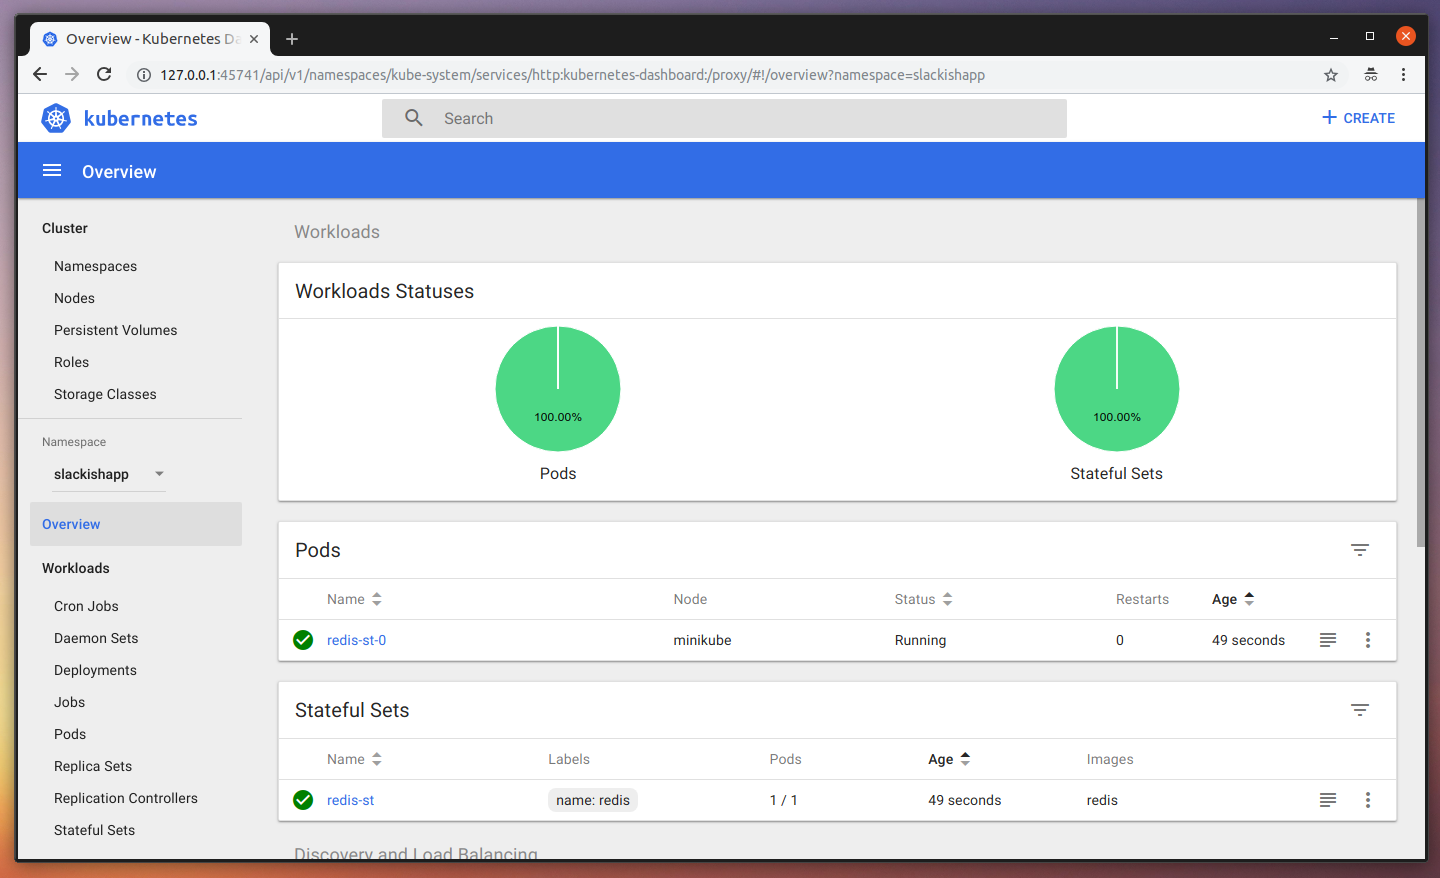
As you can see, we have our StatefulSet, our Service, and a Redis POD is already running. All ready for use. Let’s now do the same for our Mysql instance. Since it’s a lot similar to our Redis YAML files, I’ll skip the explanation and will only show the files. First, create a mysql/ folder and place the following files inside of it:
service-manifest.yaml
apiVersion: v1
kind: Service
metadata:
  name: mysql
  namespace: slackishapp
spec:
  ports:
  - port: 3306
    protocol: TCP
  selector:
    name: mysql
  clusterIP: None
volume-manifest.yaml
apiVersion: v1
kind: PersistentVolumeClaim
metadata:
  name: mysql-pv-claim
  namespace: slackishapp
spec:
  accessModes:
    - ReadWriteOnce
  resources:
    requests:
      storage: 20Gi
statefulset-manifest.yaml
apiVersion: apps/v1beta1
kind: StatefulSet
metadata:
  name: mysql
  namespace: slackishapp
spec:
  serviceName: mysql
  template:
    metadata:
      labels:
       name: mysql
      namespace: slackishapp
    spec:
      containers:
        - name: container-mysql
          image: mysql:5.7
          args:
            - "--ignore-db-dir=lost+found"
          ports:
            - containerPort: 3306
          env:
            # Use secret in real usage
            - name: MYSQL_ROOT_PASSWORD
              value: evensecreter
            - name: MYSQL_DATABASE
              value: slacksishdb
            - name: MYSQL_USER
              value: slacksishdbuser
            - name: MYSQL_PASSWORD
              value: supersecret
          volumeMounts:
            - name: mysql-persistent-storage
              mountPath: /var/lib/mysql
      volumes:
        - name: mysql-persistent-storage
          persistentVolumeClaim:
            claimName: mysql-pv-claim
I had issues with the Mysql POD not running because the Container was crashing. After some research, I got to a page describing the args used in the container description above: --ignore-db-dir=lost+found.
Now, run the same command to create all these for us, starting with the volume:
$ kubectl create -f mysql/volume-manifest.yaml
persistentvolumeclaim "mysql-pv-claim" created

$ kubectl create -f mysql/service-manifest.yaml
service "mysql" created

$ kubectl create -f mysql/statefulset-manifest.yaml
statefulset.apps "mysql" created
Now, go back to the Dashboard and see the changes reflected there:
Great! All ready for our applications. Let’s start with the Web part of it. We are going to define some Environment Variables in the YAML file itself for ease in this demo, but in reality you can use K8s Secrets or Encrypted Env files in your container images. Create a slackish/ folder, and inside of it create a web-manifest.yaml file containing:
apiVersion: extensions/v1beta1
kind: Deployment
metadata:
  name: slackish-webapp
  namespace: slackishapp
spec:
  replicas: 3
  minReadySeconds: 10
  strategy:
    type: RollingUpdate
    rollingUpdate:
      maxUnavailable: 1
      maxSurge: 1
  selector:
    matchLabels:
      app: slackish-webapp
  template:
    metadata:
      labels:
        app: slackish-webapp
      namespace: slackishapp
    spec:
      containers:
      - image: tonysm/slackish-laravel-app:latest
        name: slackish-webapp
        ports:
        - containerPort: 80
        env:
        - name: APP_NAME
          value: "Slackish"
        - name: APP_ENV
          value: "local"
        - name: APP_KEY
          value: "SUPER_SECRET"
        - name: APP_DEBUG
          value: "true"
        - name: APP_LOG_LEVEL
          value: "debug"
        - name: APP_URL
          value: "http://slackish.com:30080"
        - name: LOG_CHANNEL
          value: "stack"
        - name: DB_CONNECTION
          value: "mysql"
        - name: DB_HOST
          value: "mysql"
        - name: DB_DATABASE
          value: "slacksishdb"
        - name: DB_USERNAME
          value: "slacksishdbuser"
        - name: DB_PASSWORD
          value: "supersecret"
        - name: BROADCAST_DRIVER
          value: "pusher"
        - name: CACHE_DRIVER
          value: "redis"
        - name: SESSION_DRIVER
          value: "redis"
        - name: SESSION_LIFETIME
          value: "120"
        - name: QUEUE_DRIVER
          value: "redis"
        - name: REDIS_HOST
          value: "redis-svc"
        - name: REDIS_PASSWORD
          value: "null"
        - name: REDIS_PORT
          value: "6379"
        - name: PUSHER_APP_ID
          value: "SUPER_SECRET"
        - name: PUSHER_APP_KEY
          value: "SUPER_SECRET"
        - name: PUSHER_APP_SECRET
          value: "SUPER_SECRET"
        - name: AUTH_GOOGLE_CLIENT_ID
          value: "SUPER_SECRET"
        - name: AUTH_GOOGLE_CLIENT_SECRET
          value: "SUPER_SECRET"
        - name: AUTH_GOOGLE_REDIRECT
          value: "http://slackish.com:30080/auth/google/callback"
Let’s dissect this one a bit. We are describing a new Deployment, let’s focus on what is different from the other objects we have seen so far. First, the replicas spec. This tells K8s that this Deployment must have 3 PODs running simultaneously, and we are also telling it to wait 10 seconds for the containers to boot. You might need more or less than that, depending on how your application handles graceful restarts/terminations.
Next, we have a different piece: the Deployment strategy. We are using “RollingUpdate” here. This allows us to update POD’s containers with a zero-downtime approach. K8s will terminate the old containers running while it spins the new ones up. Which means that at a short window of time we will have both the old and new versions running simultaneously.
This is desirable in this case because we are talking about a Web application, we don’t want to stop serving HTTP requests for a release to happen. We want the release to run smoothly, and the end-users should not feel anything “faulty” while that happens. They will only notice anything different when they refresh the page, when visual things change (like design or new elements).
We are configuring the RollingUpdate to terminate 1 POD instance at a time here, you can tweak this as you wish, depending on the amount of PODs you have running to speed up your release.
Other than that, everything else is pretty much the same as the other PODs templates, besides the Environment Variables description. So, let’s go ahead and tell K8s to create this Deployment for us:
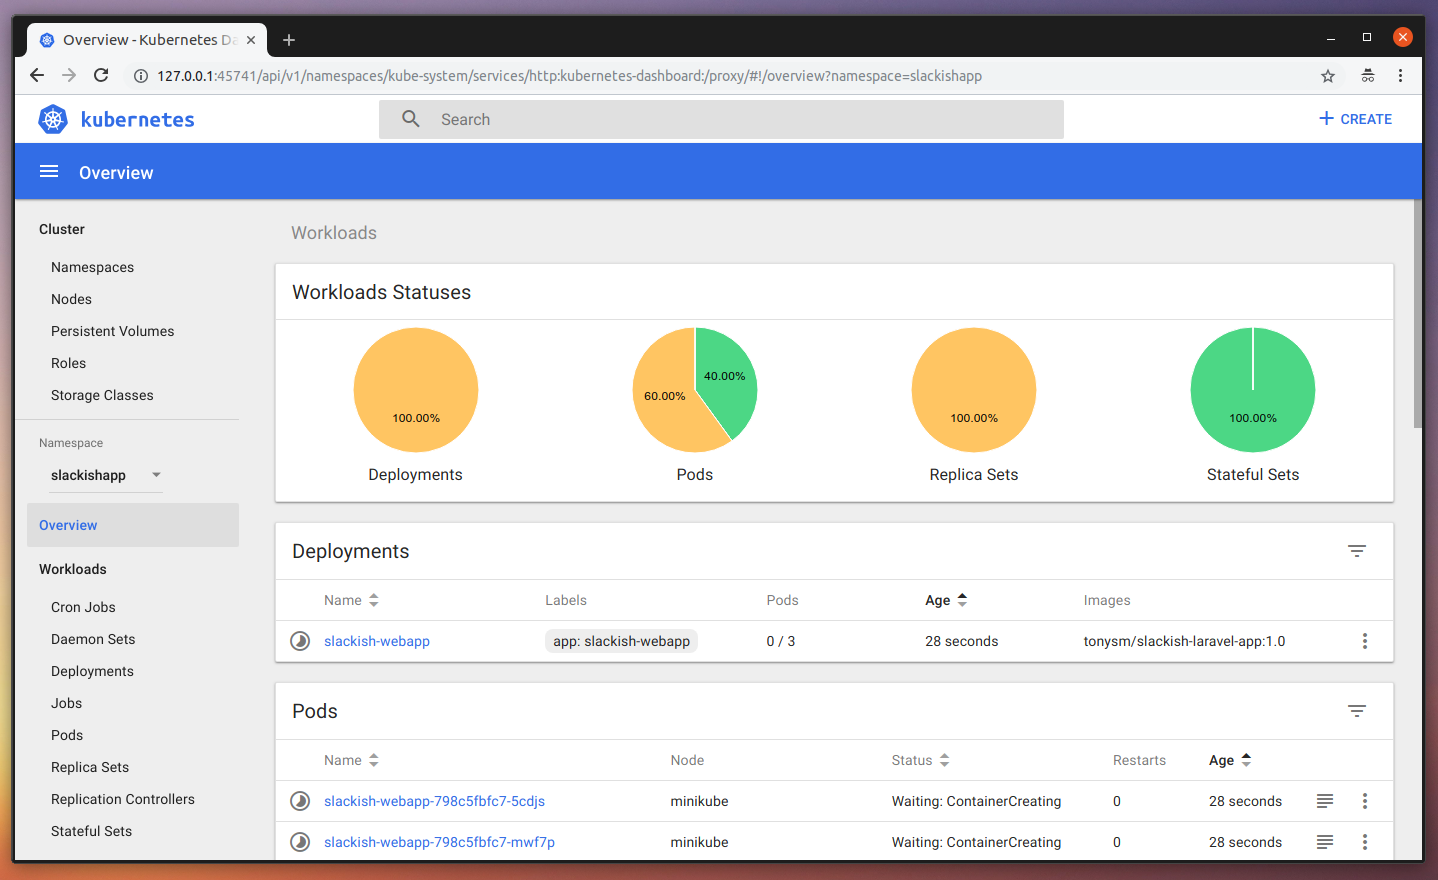
$ kubectl create -f slackish/web-manifest.yaml
deployment.extensions "slackish-webapp" created
Now, go to the dashboard and you should see the changes reflected there. K8s might need some time to pull the image, which is nice so we can see the progress in the dashboard.
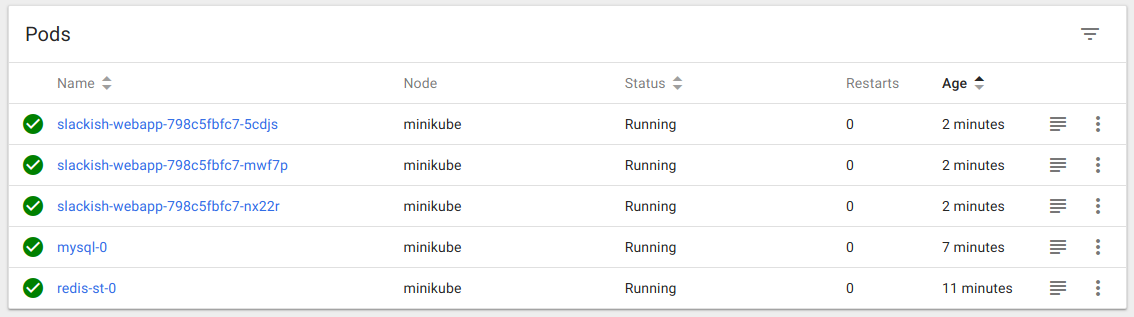
Once it finishes pulling the images, you should be able to see it all green, like this:

What is most interesting here, is you can see the 3 PODs our Deployment created:
Great! But we cannot access our application yet. The PODs containers are not exposed publicly to the outside world. So we cannot open it in the browser yet. We can use Services to fix this. In this case, we can create a single Service to match the Web PODs’ labels and only expose the Service ports to the public world.
Note: If you’re running K8s in a cloud environment, such as Google Kubernetes Engine, you can bind a Load Balancer to this Service. This should give you a Public IP which you can configure in your DNS provider so you can have your custom domain pointing to this K8s service.
Let’s create a web-service-manifest.yaml containing:
apiVersion: v1
kind: Service
metadata:
name: slackish-webapp-service
labels:
app: slackish-webapp
namespace: slackishapp
spec:
type: NodePort
ports:
- port: 80
protocol: TCP
nodePort: 30080 # Remove this if you are running in the cloud.
selector:
app: slackish-webapp
Then, use the create command in kubectl to make the change available:
$ kubectl create -f slackish/service-manifest.yaml
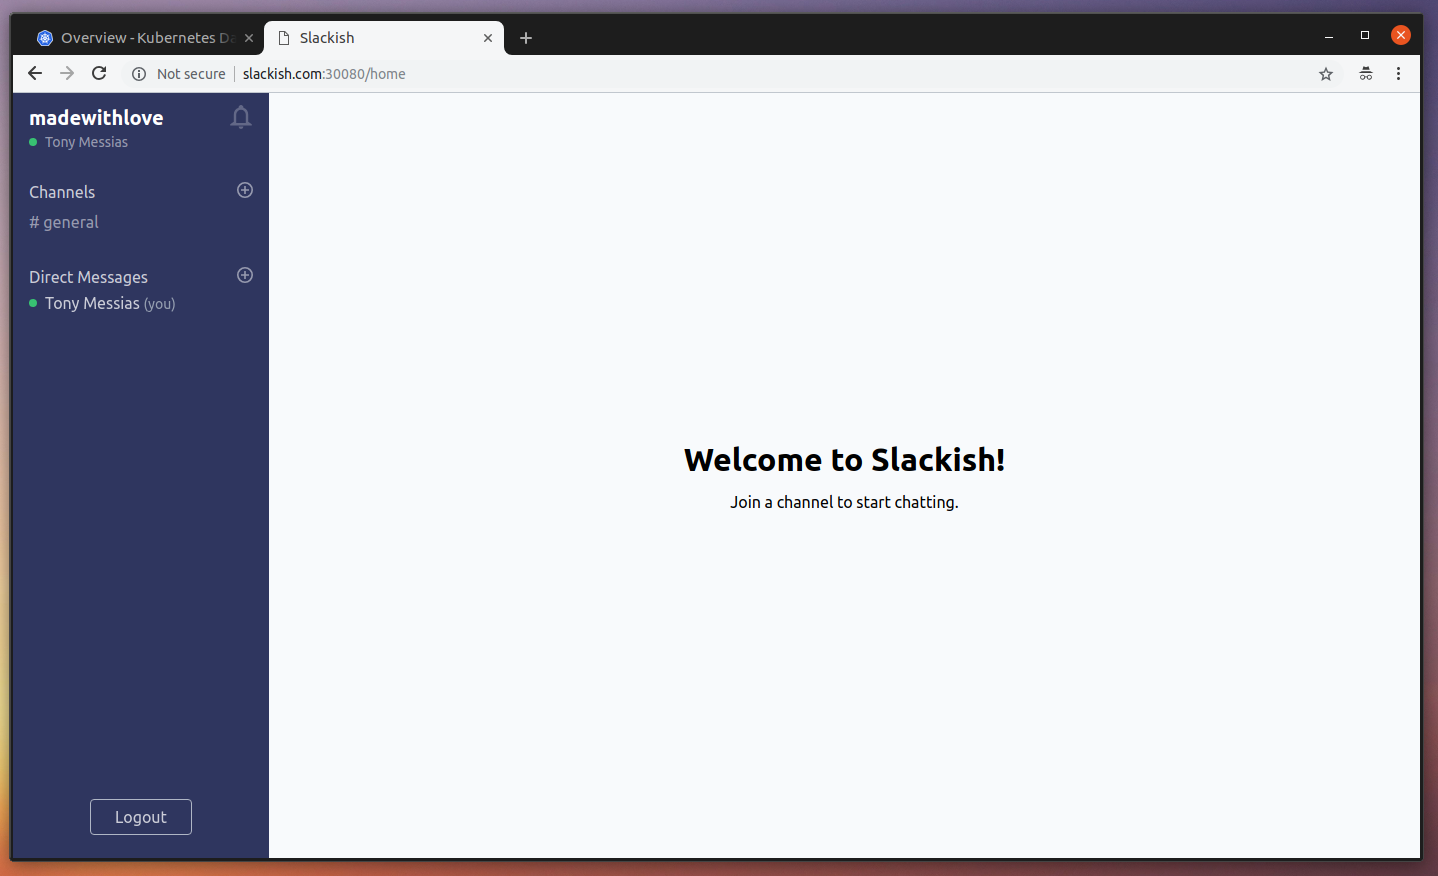
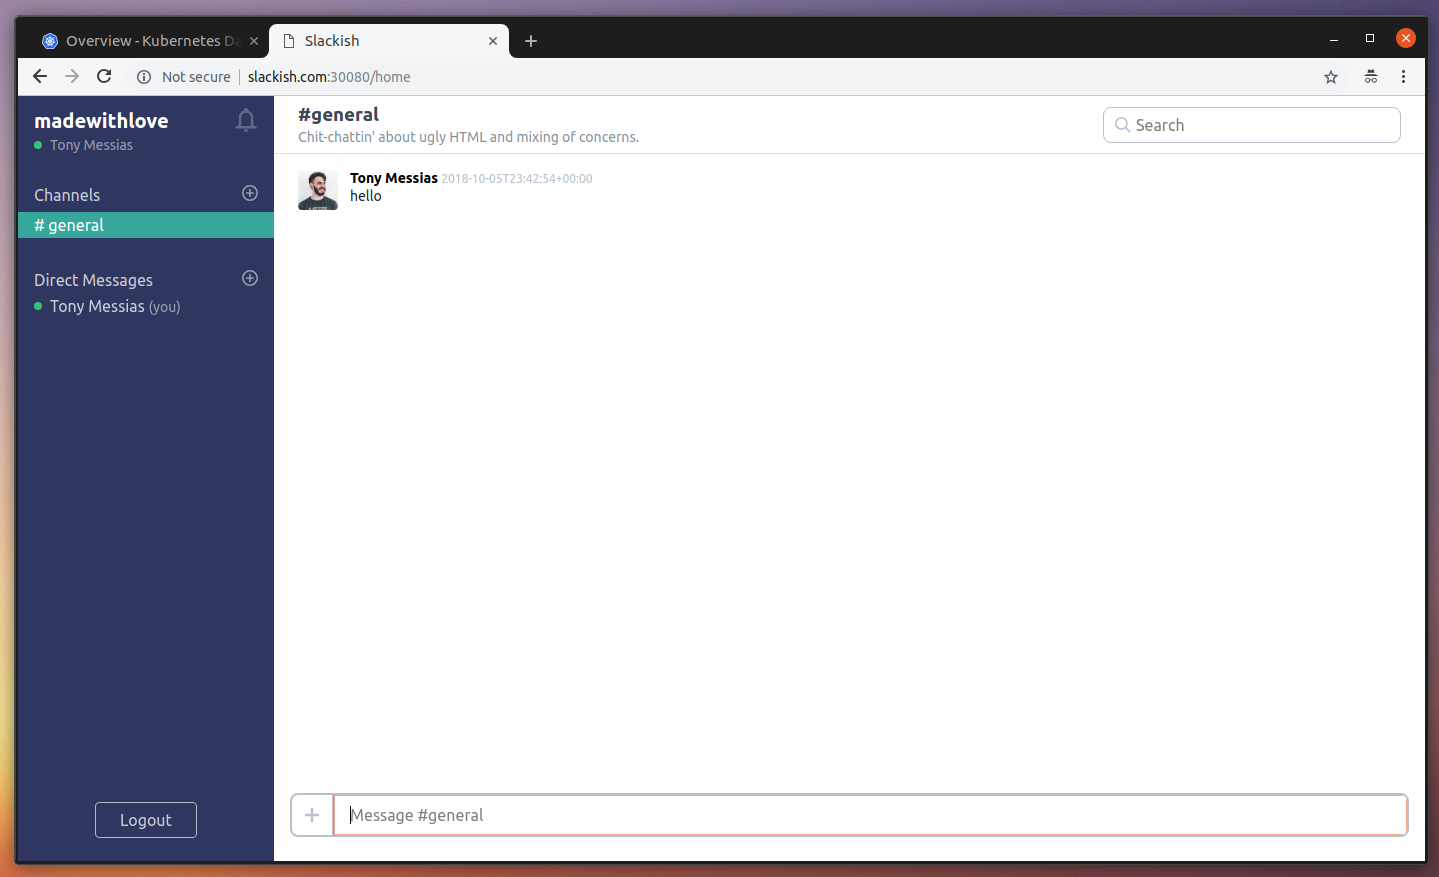
service "slackish-webapp-service" createdNow, open the VM IP in the browser using the nodePort described in our Service manifest http://192.168.99.100:30080/ and you should see the application running:
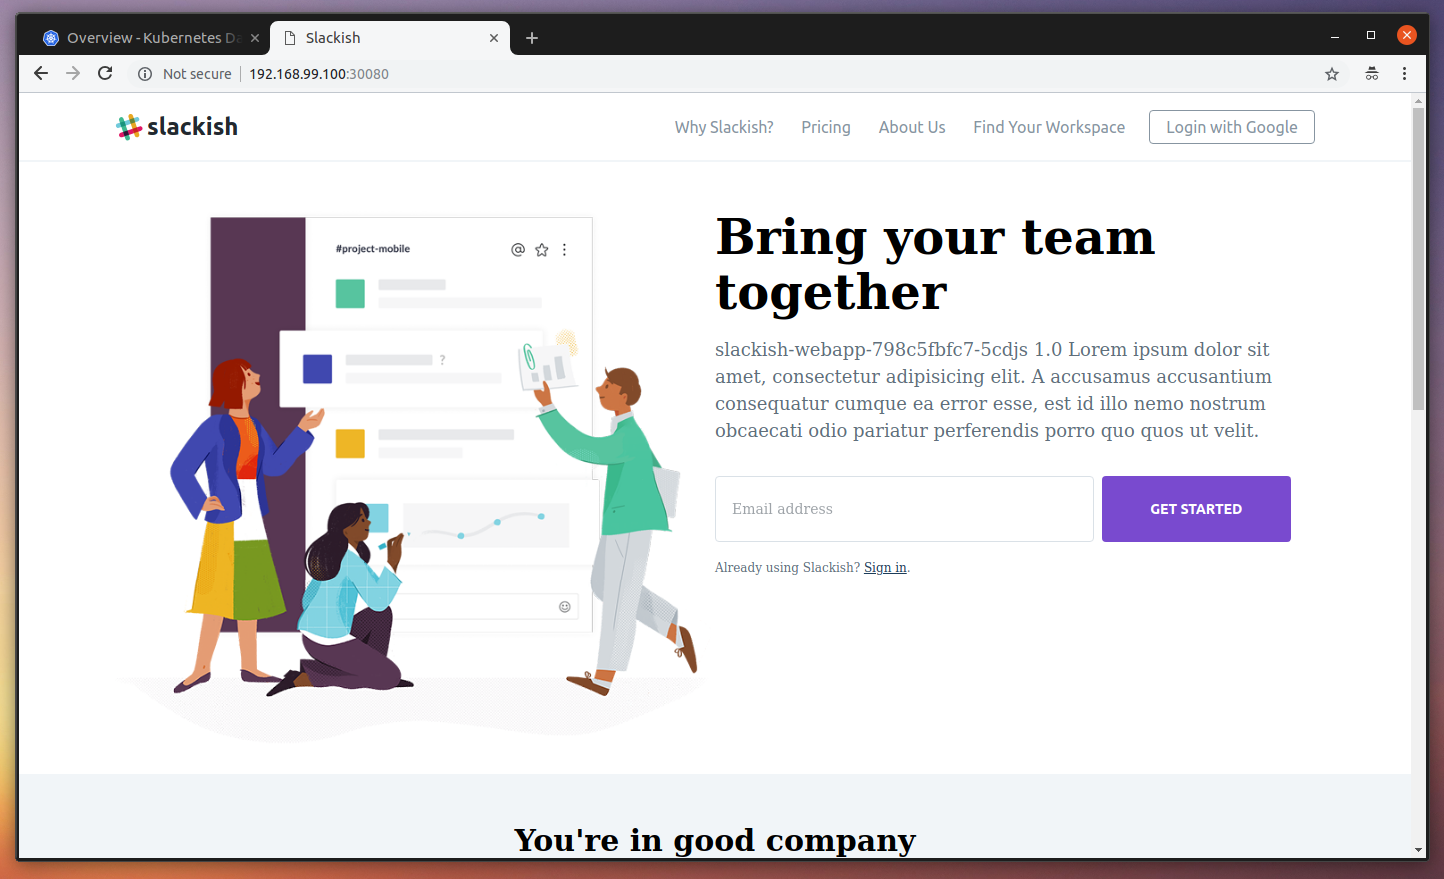
If you refresh a couple of times, you should see a different hostname printed in the homepage. This means that our HTTP request was handled by a different POD:
Great. Now, let’s login to our application. To do that, you must configure the host http://192.168.99.100:30080 in your Google Console for the Social Authentication to work. I’ll be using the domain slackish.com:30080 here, which I pointed to the VM IP (192.168.99.100) in my /etc/hosts file. Before we go any further, we need to run the migrations.
I gotta confess that this part is not that clear for me yet. So let’s do it manually for the sake of this tutorial. I’ll be researching on how to better handle it in a Containerized infrastructure. First, let’s get the POD names using the following command:
$ kubectl get pods --namespace=slackishapp
NAME                               READY     STATUS    RESTARTS   AGE
mysql-0                            1/1       Running   0          16m
redis-st-0                         1/1       Running   0          19m
slackish-webapp-798c5fbfc7-5cdjs   1/1       Running   0          10m
slackish-webapp-798c5fbfc7-mwf7p   1/1       Running   0          10m
slackish-webapp-798c5fbfc7-nx22r   1/1       Running   0          10m
Now, let’s get a shell inside one of the webapps container and run the migrations from there, like so:
$ kubectl exec --namespace=slackishapp -it slackish-webapp-798c5fbfc7-5cdjs -- /bin/bash
root@slackish-webapp-798c5fbfc7-5cdjs:/var/www/html# php artisan migrate
Migration table created successfully.
Migrating: 2014_10_12_000000_create_users_table
Migrated:  2014_10_12_000000_create_users_table
Migrating: 2016_06_01_000001_create_oauth_auth_codes_table
Migrated:  2016_06_01_000001_create_oauth_auth_codes_table
Migrating: 2016_06_01_000002_create_oauth_access_tokens_table
Migrated:  2016_06_01_000002_create_oauth_access_tokens_table
Migrating: 2016_06_01_000003_create_oauth_refresh_tokens_table
Migrated:  2016_06_01_000003_create_oauth_refresh_tokens_table
Migrating: 2016_06_01_000004_create_oauth_clients_table
Migrated:  2016_06_01_000004_create_oauth_clients_table
Migrating: 2016_06_01_000005_create_oauth_personal_access_clients_table
Migrated:  2016_06_01_000005_create_oauth_personal_access_clients_table
Migrating: 2017_10_20_213656_create_companies_table
Migrated:  2017_10_20_213656_create_companies_table
Migrating: 2017_10_20_214041_add_link_between_users_and_companies
Migrated:  2017_10_20_214041_add_link_between_users_and_companies
Migrating: 2017_10_20_225853_create_channels_table
Migrated:  2017_10_20_225853_create_channels_table
Migrating: 2017_10_20_230533_add_default_channel_id_to_companies_table
Migrated:  2017_10_20_230533_add_default_channel_id_to_companies_table
Migrating: 2017_10_21_002407_add_current_channel_id_to_users_table
Migrated:  2017_10_21_002407_add_current_channel_id_to_users_table
Great. Now you can go ahead and authenticate. You should see the Google Authorization page, which will redirect you back to inside the application, where you can register your fake company name, and then get access to the inside page of the Slackish application.
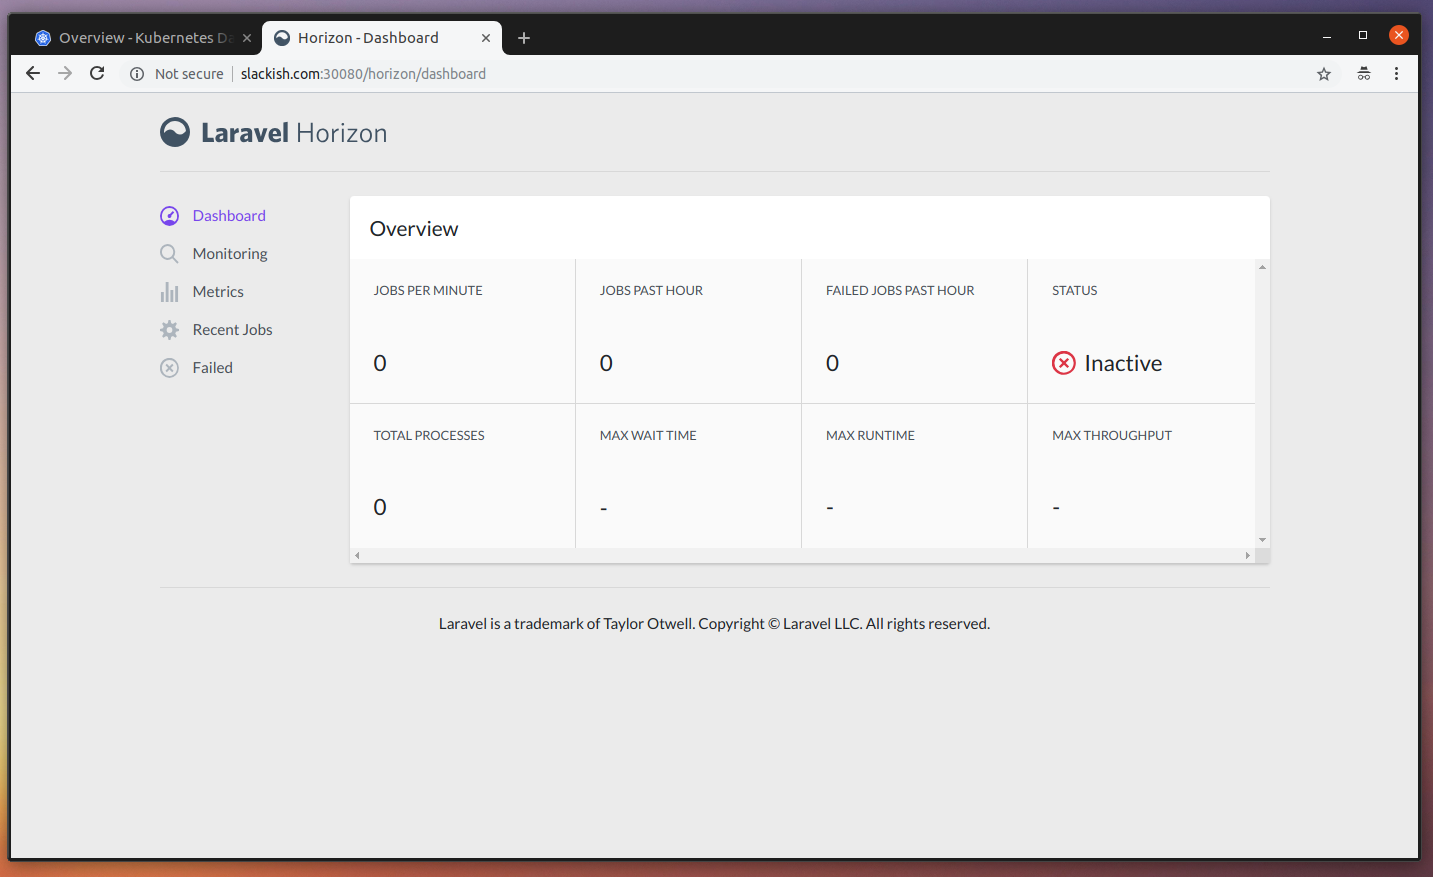
If you try joining and sending a message, you should notice that despite you see no errors, nothing is delivered. That is because although we are using queues, we don’t have any worker at the moment processing these jobs. If you open the Laravel Horizon dashboard at http://slackish.com:30080/horizon, you can see that there is 1 job but no workers:
Let’s create some workers to process this job and see the message being delivered by Pusher. First, create the worker-manifest.yaml file with the contents:
apiVersion: extensions/v1beta1
kind: Deployment
metadata:
  name: slackish-worker
  namespace: slackishapp
spec:
  replicas: 4
  minReadySeconds: 10
  strategy:
    type: RollingUpdate
    rollingUpdate:
      maxUnavailable: 1
      maxSurge: 1
  selector:
    matchLabels:
      app: slackish-worker
  template:
    metadata:
      labels:
        app: slackish-worker
      namespace: slackishapp
    spec:
      containers:
      - image: tonysm/slackish-laravel-app:latest
        name: slackish-worker
        env:
        - name: CONTAINER_ROLE
          value: "queue"
        - name: APP_NAME
          value: "Slackish"
        - name: APP_ENV
          value: "local"
        - name: APP_KEY
          value: "SUPER_SECRET"
        - name: APP_DEBUG
          value: "true"
        - name: APP_LOG_LEVEL
          value: "debug"
        - name: APP_URL
          value: "http://slackish.com:30080"
        - name: LOG_CHANNEL
          value: "stack"
        - name: DB_CONNECTION
          value: "mysql"
        - name: DB_HOST
          value: "mysql"
        - name: DB_DATABASE
          value: "slacksishdb"
        - name: DB_USERNAME
          value: "slacksishdbuser"
        - name: DB_PASSWORD
          value: "supersecret"
        - name: BROADCAST_DRIVER
          value: "pusher"
        - name: CACHE_DRIVER
          value: "redis"
        - name: SESSION_DRIVER
          value: "redis"
        - name: SESSION_LIFETIME
          value: "120"
        - name: QUEUE_DRIVER
          value: "redis"
        - name: REDIS_HOST
          value: "redis-svc"
        - name: REDIS_PASSWORD
          value: "null"
        - name: REDIS_PORT
          value: "6379"
        - name: PUSHER_APP_ID
          value: "SUPER_SECRET"
        - name: PUSHER_APP_KEY
          value: "SUPER_SECRET"
        - name: PUSHER_APP_SECRET
          value: "SUPER_SECRET"
        - name: AUTH_GOOGLE_CLIENT_ID
          value: "SUPER_SECRET"
        - name: AUTH_GOOGLE_CLIENT_SECRET
          value: "SUPER_SECRET"
        - name: AUTH_GOOGLE_REDIRECT
          value: "http://slackish.com:30080/auth/google/callback"
There is not that much difference here from the web manifest. The main difference happens inside the container; when it runs it detects the CONTAINER_ROLE environment variable and starts the horizon workers instead of the apache process (see here). Tell K8s to create the worker for us:
$ kubectl create -f slackish/worker-manifest.yaml
deployment.extensions "slackish-worker" created
When you open the Horizon dashboard, you should see the status is now “Active”, and all the 4 workers are not registered and ready to process the jobs.
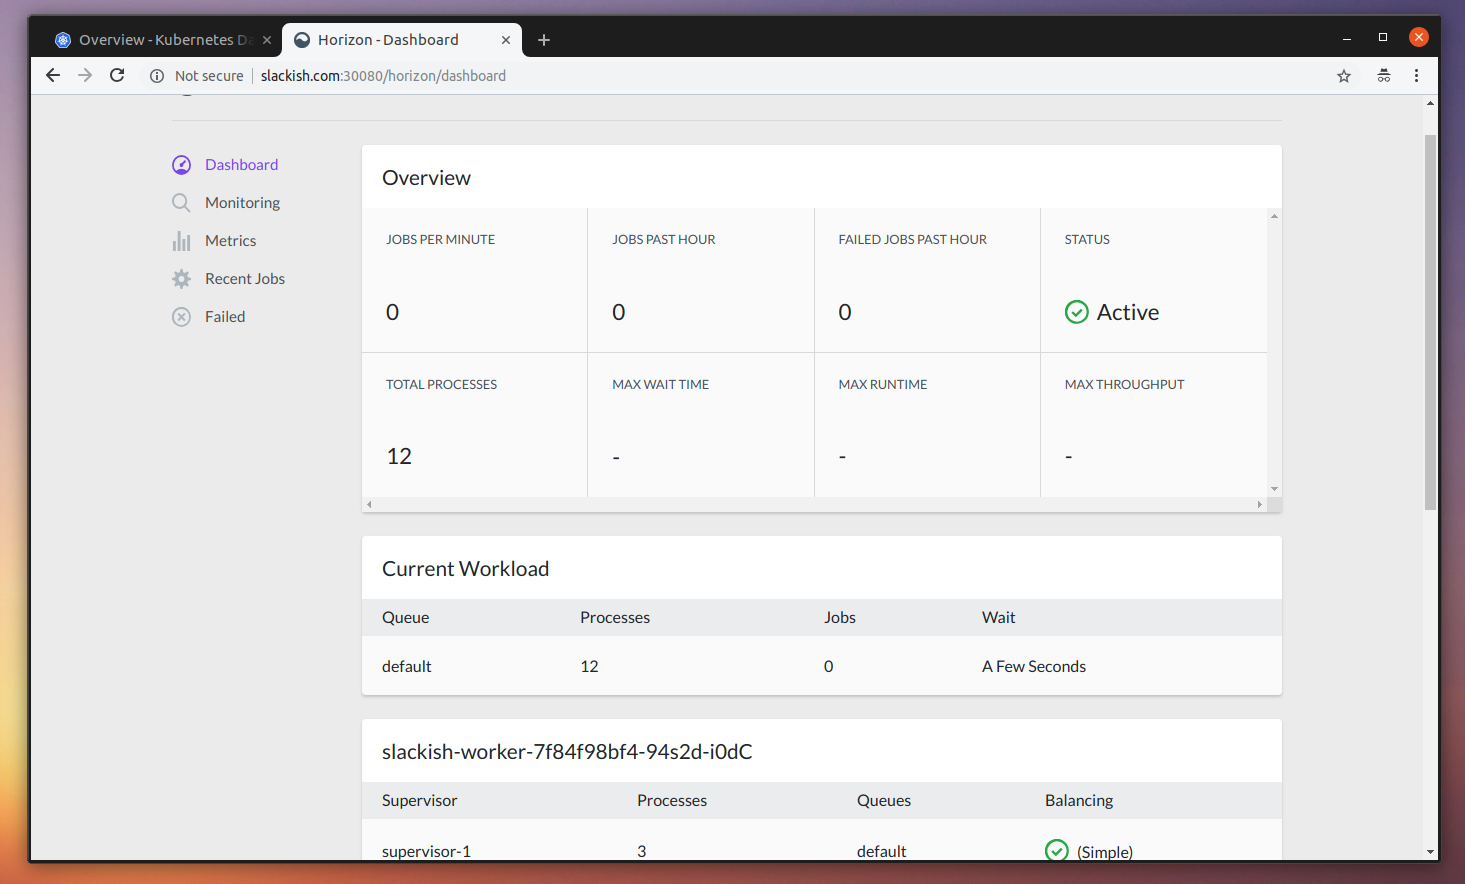
Now, if you go back to the app page you should see the previous message was sent. And you can now send more messages.
Perfect! Now, there is only one POD missing: The Scheduler. This is going to run a PHP process every minute (just like a cronjob) and we are going to run the php artisan horizon:snapshot command so we can fill our Horizon dashboard with some very useful metrics about our background jobs. Create a scheduler-manifest.yaml file with the contents:
apiVersion: extensions/v1beta1
kind: Deployment
metadata:
  name: slackish-scheduler
  namespace: slackishapp
spec:
  replicas: 1
  minReadySeconds: 10
  strategy:
    type: RollingUpdate
    rollingUpdate:
      maxUnavailable: 1
      maxSurge: 1
  selector:
    matchLabels:
      app: slackish-scheduler
  template:
    metadata:
      labels:
        app: slackish-scheduler
      namespace: slackishapp
    spec:
      containers:
      - image: tonysm/slackish-laravel-app:latest
        name: slackish-scheduler
        env:
        - name: CONTAINER_ROLE
          value: "scheduler"
        - name: APP_NAME
          value: "Slackish"
        - name: APP_ENV
          value: "local"
        - name: APP_KEY
          value: "SUPER_SECRET"
        - name: APP_DEBUG
          value: "true"
        - name: APP_LOG_LEVEL
          value: "debug"
        - name: APP_URL
          value: "http://slackish.com:30080"
        - name: LOG_CHANNEL
          value: "stack"
        - name: DB_CONNECTION
          value: "mysql"
        - name: DB_HOST
          value: "mysql"
        - name: DB_DATABASE
          value: "slacksishdb"
        - name: DB_USERNAME
          value: "slacksishdbuser"
        - name: DB_PASSWORD
          value: "supersecret"
        - name: BROADCAST_DRIVER
          value: "pusher"
        - name: CACHE_DRIVER
          value: "redis"
        - name: SESSION_DRIVER
          value: "redis"
        - name: SESSION_LIFETIME
          value: "120"
        - name: QUEUE_DRIVER
          value: "redis"
        - name: REDIS_HOST
          value: "redis-svc"
        - name: REDIS_PASSWORD
          value: "null"
        - name: REDIS_PORT
          value: "6379"
        - name: PUSHER_APP_ID
          value: "SUPER_SECRET"
        - name: PUSHER_APP_KEY
          value: "SUPER_SECRET"
        - name: PUSHER_APP_SECRET
          value: "SUPER_SECRET"
        - name: AUTH_GOOGLE_CLIENT_ID
          value: "SUPER_SECRET"
        - name: AUTH_GOOGLE_CLIENT_SECRET
          value: "SUPER_SECRET"
        - name: AUTH_GOOGLE_REDIRECT
          value: "http://slackish.com:30080/auth/google/callback"
Tell K8s to create it:
$ kubectl create -f slackish/scheduler-manifest.yaml
deployment.extensions "slackish-scheduler" created
Done! With this, you should be able to see the application running smoothly.

The final structure of the K8s git repository should be something like this:
$ tree .
.
├── mysql
│ ├── service-manifest.yaml
│ ├── statefulset-manifest.yaml
│ └── volume-manifest.yaml
├── redis
│ ├── service-manifest.yaml
│ ├── statefulset-manifest.yaml
│ └── volume-manifest.yaml
├── slackish
│ ├── scheduler-manifest.yaml
│ ├── service-manifest.yaml
│ ├── web-manifest.yaml
│ └── worker-manifest.yaml
└── slackish-namespace-manifest.yaml
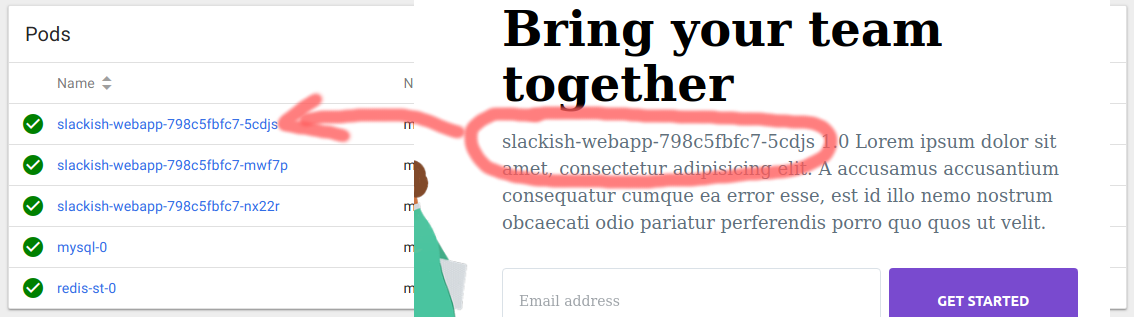
3 directories, 11 filesLet’s do a new release now. I have published a 1.0 tag of the Slackish version. We have to change our image tags to point to that one, so:
web-manifest.yaml
    spec:
      containers:
-      - image: tonysm/slackish-laravel-app:latest
+      - image: tonysm/slackish-laravel-app:1.0
        name: slackish-webapp
This is the piece that we could automate, if we wanted. We could have a CI hook sending these changes to the K8s repository via PRs (as a talk suggests here). Now, let’s apply these changes to our deployments:
$ kubectl apply -f slackish/web-manifest.yaml
Warning: kubectl apply should be used on resource created by either kubectl create --save-config or kubectl apply
deployment.extensions "slackish-webapp" configured
Although we got a warning, things should be working, as you can see in the pictures:

There is a 1.0 hard-coded version in the 1.0 docker image, as shown in the text next to the hostname in the image above.
Final Considerations
It’s been a long road so far; it’s time to wrap things up. I’ve got to say that this experiment was really exciting and the K8s learning process was really interesting. I was able to run this exact same application in the Google Kubernetes Engine in the cloud with 3 nodes with pretty much the same commands (I only had to remove the nodePort config in the webapp service manifest).
Then I was able to bind a Load Balancer to the Kubernetes Service that was proxying requests to my web PODs with no further trouble. Then I pointed a testing domain name to the Google Load Balancer (it gives you a public IP when you create one).
Creating a Cluster in the Google Kubernetes Engine is pretty easy. With only a couple clicks you can create a cluster with 3 or more nodes (I haven’t tried with fewer), and they even have a pricing calculator so you can tweak the configs and generate some billing estimation for your application.
You may also have noticed that you can use this same cluster for more than one application. You can also add more nodes as you need, label the nodes and do matching on that level as well, so if your PODs need to run in a node with more RAM or SSD, for example, you can do that.
For production, I also recommend using Google Cloud SQL instead of running a database POD, and Cloud Memorystore instead of running Redis as a POD, only because I’m not that experienced with running stateful services on containers in production with a High Availability approach, so I would prefer to rely on an external service instead. This would increase the bill but could be worth it.
That’s it. See you soon!


Member discussion