


Last updated: December 2020
By now you’ve probably heard about this new cool tool on the block called Webpack. If you haven’t looked that much into it you’re probably a bit confused by some people calling it a build tool à la Gulp and other people calling it a bundler like Browserify. If on the other hand you have looked into it you’re probably still confused because the homepage presents Webpack as both.
To be honest, at first the blur around “what Webpack is” frustrated me, and I closed the tab. After all I already had a build system, and was perfectly happy with it. And if you follow closely the very fast Javascript scene, like me, you’ve probably been burnt in the past by jumping on the bandwagon too soon. Having now a bit more experience with it I felt I should write this article for those still on the fence to explain more clearly what Webpack is, and more importantly what is so great about it that it deserves so much attention.
What is Webpack?
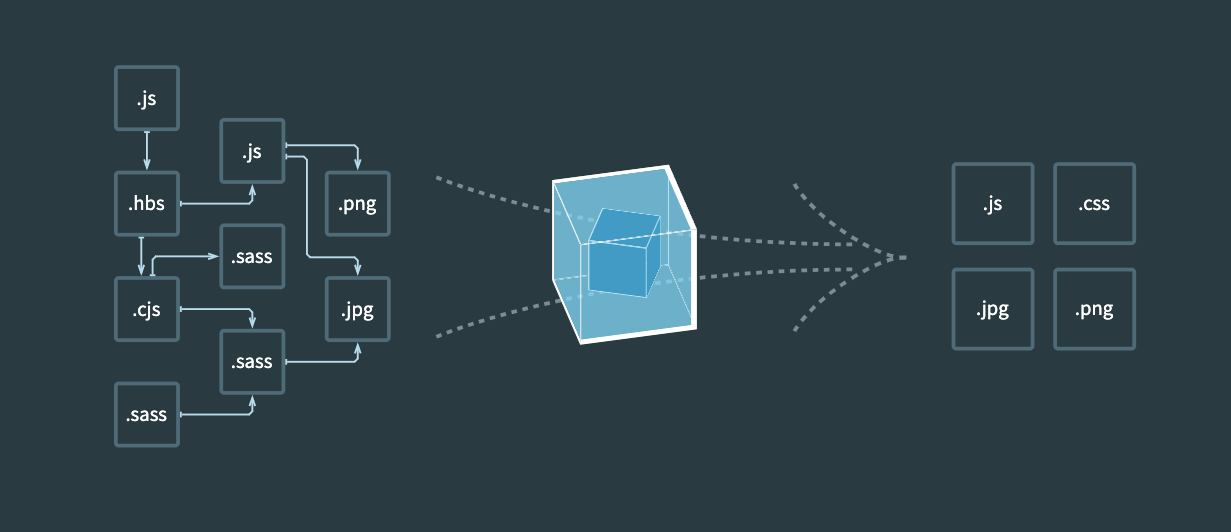
Right off the bat let’s answer the question posed by the introduction: is Webpack a build system or a module bundler? Well, it’s both– and by this I don’t mean that it does both I mean that it combines both. Webpack doesn’t build your assets, and then separately bundle your modules, it considers your assets to be modules themselves.
What this means more precisely is that instead of building all your Sass files, and optimizing all your images, and including them on one side, then bundling all your modules, and including them on your page on another, you have this:
import stylesheet from 'styles/my-styles.scss';
import logo from 'img/my-logo.svg';
import someTemplate from 'html/some-template.html';

console.log(stylesheet); // "body{font-size:12px}"
console.log(logo); // "data:image/svg+xml;base64,PD94bWwgdmVyc2lvbj0iMS4wIiBlbmNvZGluZz0iVVRGLTgiIHN0YW5kYWxvbmU9Im5[...]"
console.log(someTemplate) // "<html><body><h1>Hello</h1></body></html>"
All your assets are considered modules themselves, that can be imported, modified, manipulated, and that ultimately can be packed into your final bundle.
In order for this to work, you register loaders in your Webpack configuration. Loaders are small plugins that basically say “When you encounter this kind of file, do this with it”. Some examples of loaders:
{
  // When you import a .ts file, parse it with Typescript
  test: /.ts/,
  loader: 'typescript',
},
{
  // When you encounter images, compress them with image-webpack (wrapper around imagemin)
  // and then inline them as data64 URLs
  test: /.(png|jpg|svg)/,
  loaders: ['url', 'image-webpack'],
},
{
  // When you encounter SCSS files, parse them with node-sass, then pass autoprefixer on them
  // then return the results as a string of CSS
  test: /.scss/,
  loaders: ['css', 'autoprefixer', 'sass'],
}
Ultimately at the end of the food chain all loaders return strings. This allows Webpack to wrap them into Javascript modules. Per example once your Sass file is done being transformed by the loaders, it may internally look something like that:
export default 'body{font-size:12px}';Why on earth would you do that?
Once you understand what Webpack does that’s most likely the second question that will come to mind: what possible benefits could this approach have? “Images and CSS? In my JS? What the hell man?”. Well consider this: for a long while we’ve been taught and trained to concatenate all the things into one single file; to be very preserving about our HTTP requests, yada yada.
This has led to one big downside which is that most people nowadays bundle all their assets into one single app.js file that is then included in all the pages. Which means most of the time on any given page you’re loading a ton of assets that aren’t required. And if you aren’t doing that, then you’re most likely including assets by hand on certain pages but not on others, which leads to a big mess of dependency trees to maintain and keep track of: on which pages is this dependency needed already? Which pages do the stylesheets A and B affect?
Neither approaches are right, nor wrong. Consider Webpack a middleground– it’s not just a build system or a bundler, it’s a wicked smart module packing system. Once properly configured, it’ll know more about your stack then even you do, and it’ll know better than you how to best optimize it.
Let’s build a small app together
In order for you to more easily understand the benefits of Webpack we’ll build a very small app and bundle the assets with it. For this tutorial I recommend running Node 4 (or 5) and NPM 3 as the flat dependency tree will avoid a good bunch of headaches when working with Webpack. If you don’t have NPM 3 yet, you can install it through npm install npm@3 -g.
$ node --version
v5.7.1
$ npm --version
3.6.0
I also recommend you add node_modules/.bin to your PATH variable to avoid having to type node_modules/.bin/webpack every time. All examples after this won’t show the node_modules/.bin part of the commands I’ll run.
Basic bootstrapping
Let’s start by creating our project and installing Webpack, we’ll also pull in jQuery to demonstrate some things later on.
$ npm init -y
$ npm install jquery --save
$ npm install webpack --save-dev
Now let’s create our app’s entry point, in plain ES5 for now:
src/index.js
var $ = require('jquery');

$('body').html('Hello');
And let’s create our Webpack configuration, in a webpack.config.js file. Webpack configuration is just Javascript, and needs to export an object:
webpack.config.js
module.exports = {
    entry:  './src',
    output: {
        path:     'builds',
        filename: 'bundle.js',
    },
};
Here, entry tells Webpack which files are the entry points of your application. Those are your main files, that sit at the top of your dependency tree. Then we tell it to compile our bundle in the builds directory under the name bundle.js. So let’s setup our index HTML accordingly:
<!DOCTYPE html>
<html>
<body>
    <h1>My title</h1>
    <a>Click me</a>

    <script src="builds/bundle.js"></script>
</body>
</html>
Let’s run Wepack, and if everything went right we should get a message telling us it compiled our bundle.js properly:
$ webpack
Hash: d41fc61f5b9d72c13744
Version: webpack 1.12.14
Time: 301ms
    Asset    Size  Chunks             Chunk Names
bundle.js  268 kB       0  [emitted]  main
   [0] ./src/index.js 53 bytes {0} [built]
    + 1 hidden modules
Here you can see Webpack tells you your bundle.js contains our entry point (index.js) as well as one hidden module. This is jQuery, by default Webpack hides modules that are not yours. To see all the modules compiled by Webpack, we can pass the --display-modules flag:
$ webpack --display-modules
bundle.js  268 kB       0  [emitted]  main
   [0] ./src/index.js 53 bytes {0} [built]
   [1] ./~/jquery/dist/jquery.js 259 kB {0} [built]
You can also run webpack --watch to make it automatically watch for changes to your files and recompile as needed.
Setting up our first loader
Now remember how we talked about Webpack being able to import CSS and HTML and all kinds of things? Where does that fit in? Well if you’re in tune with the large movement towards Web Components these past few years (Angular 2, Vue, React, Polymer, X-Tag, etc.) you’ve probably heard about the idea that your app – instead of being one interconnected monolithic piece of UI – would be more maintainable as a set of small reusable self-contained pieces of UI: web components (I’m simplifying here, but you get the idea). Now in order for components to be truly self-contained, they need to pack all their requirements within themselves. Imagine a button component: it has some HTML sure, but also some JS to make it interact with things, and probably also some styles. It would be nice if all of those would only be loaded when needed, right? Only when we import the Button component, would we get all its related assets.
Let’s write our button; first-off, as most of you are I assume now more accustomed to ES2015 we’ll add our first loader: Babel.
To install a loader in Webpack you do two things: npm install {whatever}-loader, and add it to the module.loaders part of your Webpack configuration, so let’s do that. Here we want babel, so:
$ npm install babel-loader --save-devWe’ll also need to install Babel itself as in this particular case the loader won’t install it. We’ll need the babel-core package and the es2015 preset:
$ npm install babel-core babel-preset-es2015 --save-devAnd we’re going to create a .babelrc file to tell Babel to use that preset. It’s a simple JSON file allowing you to configure what transformers Babel will run on your code – in our case we’ll tell it to use the es2015 preset.
.babelrc
{
  "presets": ["es2015"]
}
Now that Babel is setup and configured we can update our configuration: what do we want? We want Babel to run on all files that end in .js, but as Webpack traverses all dependencies we want to avoid Babel running on third-party code like jQuery, so we can filter this a bit more. Loaders can have both an include or an exclude rule. It can be a string, a regex, a callback, whatever you want. In our case, we want Babel to only run on our files, so we’ll include only our source directory:
module.exports = {
    entry:  './src',
    output: {
        path:     'builds',
        filename: 'bundle.js',
    },
    module: {
        loaders: [
            {
                test:   /.js/,
                loader: 'babel',
                include: __dirname + '/src',
            }
        ],
    }
};
We can now rewrite our little index.js in ES6 since we pulled in Babel. All examples from now on will be in ES6.
import $ from 'jquery';

$('body').html('Hello');
Writing a small component
Let’s now write a small Button component, it’ll have some SCSS styles, an HTML template, and some behavior. So we’ll install the things we need. First of all we’ll need Mustache which is a very lightweight templating package, but we’ll also need loaders for Sass and HTML files. Also, as results are piped from one loader to another, we’ll need a CSS loader to handle the results of the Sass loader. Now, once we have our CSS, there are multiple ways to handle them, for now we’ll use a loader called the style-loader which takes a piece of CSS and injects it into the page dynamically.
$ npm install mustache --save
$ npm install css-loader style-loader html-loader sass-loader node-sass --save-dev
Now in order to tell Webpack to “pipe” things from one loader to another we simply pass a series of loaders, from right to left, separated by a !. Alternatively you can use an array by using the loaders attribute instead of loader:
{
    test:    /.js/,
    loader:  'babel',
    include: __dirname + '/src',
},
{
    test:   /.scss/,
    loader: 'style!css!sass',
    // Or
    loaders: ['style', 'css', 'sass'],
},
{
    test:   /.html/,
    loader: 'html',
}
Now that we have our loaders in place, let’s write our button:
src/Components/Button.scss
.button {
  background: tomato;
  color: white;
}
src/Components/Button.html
{% raw %}
<a class="button" href="{{link}}">{{text}}</a>
{% endraw %}
src/Components/Button.js
import $ from 'jquery';
import template from './Button.html';
import Mustache from 'mustache';
import './Button.scss';
export default class Button {
constructor(link) {
this.link = link;
}
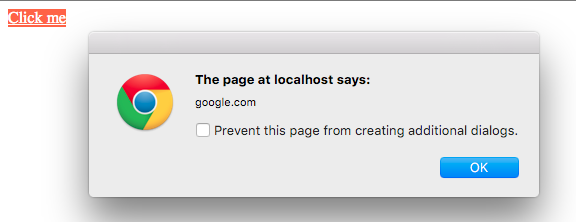
onClick(event) {
event.preventDefault();
alert(this.link);
}
render(node) {
const text = $(node).text();
// Render our button
$(node).html(
Mustache.render(template, {text})
);
// Attach our listeners
$('.button').click(this.onClick.bind(this));
}
}Your Button.js is now 100% self-contained and whenever imported, in whichever context it’ll run, it’ll have all the tools in hands to be used and rendered properly. Now we just need to render (very dirtily) our Button on our page:
src/index.js
import Button from './Components/Button';

const button = new Button('google.com');
button.render('a');
Let’s try to run Webpack and refresh our page, you should now see our disgusting button in action.
You’ve now learned how to setup loaders and how to define the dependencies of each part of your app. This may look like it doesn’t matter much now, but let’s push our example further.
Code splitting
This example is fine and everything, but maybe we don’t always need our button. Maybe on some pages there won’t be an a to render the button on, and in these cases, we’d like to not import all the Button styles, and templates, and Mustache and everything, correct? That’s when code splitting comes into play. Code splitting is Webpack’s answer to this problematic of “Monolithic bundle” vs “Unmaintainable manual imports”. It’s the idea that you define, in your code, “split points”: areas of your code that could be easily split off into a separate file and then loaded on-demand. The syntax is very simple:
import $ from 'jquery';

// This is a split point
require.ensure([], () => {
  // All the code in here, and everything that is imported
  // will be in a separate file
  const library = require('some-big-library');
  $('foo').click(() => library.doSomething());
});
Everything in the require.ensure callback would be split into a chunk – a separate bundle that Webpack will load only when needed, through an AJAX request. That means we would basically have this:
bundle.js
|- jquery.js
|- index.js // our main file
chunk1.js
|- some-big-libray.js
|- index-chunk.js // the code in the callback
And you don’t have to import or load chunk1.js anywhere. Webpack will load it on-demand, only when it is needed. That means you can wrap chunks of your code with various pieces of logic, which is what we’ll do in our example. We only want our Button component when we have a link on the page:
src/index.js
if (document.querySelectorAll('a').length) {
    require.ensure([], () => {
        const Button = require('./Components/Button').default;
        const button = new Button('google.com');

        button.render('a');
    });
}
Note that when using require if you want the default export you need to manually grab it through .default. Reason for this is require doesn’t handle both default and normal exports so you have to specify which to return. Whereas import has a system for this in place so it knows already (eg. import foo from 'bar') vs import {baz} from 'bar').
Webpack’s output should now be different, accordingly. Let’s run it with the --display-chunks flag to see what modules are in which chunks:
$ webpack --display-modules --display-chunks
Hash: 43b51e6cec5eb6572608
Version: webpack 1.12.14
Time: 1185ms
      Asset     Size  Chunks             Chunk Names
  bundle.js  3.82 kB       0  [emitted]  main
1.bundle.js   300 kB       1  [emitted]
chunk    {0} bundle.js (main) 235 bytes [rendered]
    [0] ./src/index.js 235 bytes {0} [built]
chunk    {1} 1.bundle.js 290 kB {0} [rendered]
    [1] ./src/Components/Button.js 1.94 kB {1} [built]
    [2] ./~/jquery/dist/jquery.js 259 kB {1} [built]
    [3] ./src/Components/Button.html 72 bytes {1} [built]
    [4] ./~/mustache/mustache.js 19.4 kB {1} [built]
    [5] ./src/Components/Button.scss 1.05 kB {1} [built]
    [6] ./~/css-loader!./~/sass-loader!./src/Components/Button.scss 212 bytes {1} [built]
    [7] ./~/css-loader/lib/css-base.js 1.51 kB {1} [built]
    [8] ./~/style-loader/addStyles.js 7.21 kB {1} [built]
As you can see, our entry point (bundle.js) now only contains some Webpack logic, and everything else (jQuery, Mustache, Button) is in the 1.bundle.js chunk and will only be loaded if we have an anchor on the page. Now in order for Webpack to know where to find the chunks when loading them with AJAX, we have to add a little line to our configuration:
path:       'builds',
filename:   'bundle.js',
publicPath: 'builds/',
The output.publicPath option tells Webpack where to find built assets from the point of view of the page (so in our case in /builds/). If we visit our page now we’ll see that everything is still working, but more importantly we’ll see that, since we had an anchor on the page, Webpack properly loaded our chunk:

If we didn’t have an anchor on our page, only bundle.js would have been loaded. This allows you to intelligently split off heavy logic in your application and only let each page require what it truly needs. Note also that we can name our split points so that instead of 1.bundle.js we have more meaningful chunk names. You can do so by passing a third argument to require.ensure:
require.ensure([], () => {
    const Button = require('./Components/Button').default;
    const button = new Button('google.com');

    button.render('a');
}, 'button');
Would generate button.bundle.js instead of 1.bundle.js.
Adding a second component
Now this is pretty cool and all but let’s add a second component to see if it works:
src/Components/Header.scss
.header {
  font-size: 3rem;
}
src/Components/Header.html
{% raw %}
<header class="header">{{text}}</header>
{% endraw %}
src/Components/Header.js
import $ from 'jquery';
import Mustache from 'mustache';
import template from './Header.html';
import './Header.scss';

export default class Header {
    render(node) {
        const text = $(node).text();

        $(node).html(
            Mustache.render(template, {text})
        );
    }
}
And let’s render it in our application:
// If we have an anchor, render the Button component on it
if (document.querySelectorAll('a').length) {
    require.ensure([], () => {
        const Button = require('./Components/Button');
        const button = new Button('google.com');

        button.render('a');
    });
}

// If we have a title, render the Header component on it
if (document.querySelectorAll('h1').length) {
    require.ensure([], () => {
        const Header = require('./Components/Header');

        new Header().render('h1');
    });
}
Now if you look at the output Webpack with the --display-chunks --display-modules flags:
$ webpack --display-modules --display-chunks
Hash: 178b46d1d1570ff8bceb
Version: webpack 1.12.14
Time: 1548ms
      Asset     Size  Chunks             Chunk Names
  bundle.js  4.16 kB       0  [emitted]  main
1.bundle.js   300 kB       1  [emitted]
2.bundle.js   299 kB       2  [emitted]
chunk    {0} bundle.js (main) 550 bytes [rendered]
    [0] ./src/index.js 550 bytes {0} [built]
chunk    {1} 1.bundle.js 290 kB {0} [rendered]
    [1] ./src/Components/Button.js 1.94 kB {1} [built]
    [2] ./~/jquery/dist/jquery.js 259 kB {1} {2} [built]
    [3] ./src/Components/Button.html 72 bytes {1} [built]
    [4] ./~/mustache/mustache.js 19.4 kB {1} {2} [built]
    [5] ./src/Components/Button.scss 1.05 kB {1} [built]
    [6] ./~/css-loader!./~/sass-loader!./src/Components/Button.scss 212 bytes {1} [built]
    [7] ./~/css-loader/lib/css-base.js 1.51 kB {1} {2} [built]
    [8] ./~/style-loader/addStyles.js 7.21 kB {1} {2} [built]
chunk    {2} 2.bundle.js 290 kB {0} [rendered]
    [2] ./~/jquery/dist/jquery.js 259 kB {1} {2} [built]
    [4] ./~/mustache/mustache.js 19.4 kB {1} {2} [built]
    [7] ./~/css-loader/lib/css-base.js 1.51 kB {1} {2} [built]
    [8] ./~/style-loader/addStyles.js 7.21 kB {1} {2} [built]
    [9] ./src/Components/Header.js 1.62 kB {2} [built]
   [10] ./src/Components/Header.html 64 bytes {2} [built]
   [11] ./src/Components/Header.scss 1.05 kB {2} [built]
   [12] ./~/css-loader!./~/sass-loader!./src/Components/Header.scss 192 bytes {2} [built]
You may see a rather major issue: both our components need jQuery and Mustache, which means these dependencies are getting duplicated in our chunks, which is not what we want. By default Webpack will perform very little optimizations. But it packs in a lot of firepower to help you turn things around, in the form of plugins.
Plugins differ from loaders in the sense that instead of only executing on a certain set of files, and being more of a “pipe”, they execute on all files and perform more advanced actions, that aren’t necessarily related to transformations. Webpack comes will a handful of plugins to perform all various kinds of optimizations. The one that interests us in this case is the CommonChunksPlugin: it analyzes your chunks for recurring dependencies, and extracts them somewhere else. It can be a completely separate file (like vendor.js) or it can be your main file.
In our case we’d like to move common dependencies to our entry file because, if all pages need jQuery and Mustache, we might as well move it up. So let’s update our configuration:
var webpack = require('webpack');

module.exports = {
    entry:   './src',
    output:  {
      // ...
    },
    plugins: [
        new webpack.optimize.CommonsChunkPlugin({
            name:      'main', // Move dependencies to our main file
            children:  true, // Look for common dependencies in all children,
            minChunks: 2, // How many times a dependency must come up before being extracted
        }),
    ],
    module:  {
      // ...
    }
};
If we run Webpack again, we can see it’s looking much better. Here main is the name of the default chunk.
chunk    {0} bundle.js (main) 287 kB [rendered]
    [0] ./src/index.js 550 bytes {0} [built]
    [2] ./~/jquery/dist/jquery.js 259 kB {0} [built]
    [4] ./~/mustache/mustache.js 19.4 kB {0} [built]
    [7] ./~/css-loader/lib/css-base.js 1.51 kB {0} [built]
    [8] ./~/style-loader/addStyles.js 7.21 kB {0} [built]
chunk    {1} 1.bundle.js 3.28 kB {0} [rendered]
    [1] ./src/Components/Button.js 1.94 kB {1} [built]
    [3] ./src/Components/Button.html 72 bytes {1} [built]
    [5] ./src/Components/Button.scss 1.05 kB {1} [built]
    [6] ./~/css-loader!./~/sass-loader!./src/Components/Button.scss 212 bytes {1} [built]
chunk    {2} 2.bundle.js 2.92 kB {0} [rendered]
    [9] ./src/Components/Header.js 1.62 kB {2} [built]
   [10] ./src/Components/Header.html 64 bytes {2} [built]
   [11] ./src/Components/Header.scss 1.05 kB {2} [built]
   [12] ./~/css-loader!./~/sass-loader!./src/Components/Header.scss 192 bytes {2} [built]
If we specified per example name: 'vendor':
new webpack.optimize.CommonsChunkPlugin({
    name:      'vendor',
    children:  true,
    minChunks: 2,
}),
Since that chunk doesn’t exist yet, Webpack would have created a builds/vendor.js that we would have then manually imported in our HTML:
<script src="builds/vendor.js"></script>
<script src="builds/bundle.js"></script>
You can also make common dependencies be loaded asynchronously by not providing a common chunk name and instead specifying async: true. Webpack has a lot of these powerful intelligent optimizations. I can’t possibly name them all but as an exercise let’s try to create a production version of our application.
To production and beyond
Ok first of all, we’re going to add several plugins to our configuration, but we only want to load them when NODE_ENV equals production so let’s add some logic for that in our configuration. Since it’s just a JS file, that’s easy to do:
var webpack    = require('webpack');
var production = process.env.NODE_ENV === 'production';

var plugins = [
    new webpack.optimize.CommonsChunkPlugin({
        name:      'main', // Move dependencies to our main file
        children:  true, // Look for common dependencies in all children,
        minChunks: 2, // How many times a dependency must come up before being extracted
    }),
];

if (production) {
    plugins = plugins.concat([
       // Production plugins go here
    ]);
}

module.exports = {
    entry:   './src',
    output:  {
        path:       'builds',
        filename:   'bundle.js',
        publicPath: 'builds/',
    },
    plugins: plugins,
    // ...
};
Now second, Webpack also has several settings that we can switch off in production:
module.exports = {
    debug:   !production,
    devtool: production ? false : 'eval',
The first setting switches loaders to and from debug mode, which means they won’t pack-in more code to let you more easily debug things in local. The second is about sourcemaps generation. Webpack has several ways to render sourcemaps, eval is just the best one in local. In production we may not really care about sourcemaps so we disable them. Now let’s add our production plugins:
if (production) {
    plugins = plugins.concat([

        // This plugin looks for similar chunks and files
        // and merges them for better caching by the user
        new webpack.optimize.DedupePlugin(),

        // This plugins optimizes chunks and modules by
        // how much they are used in your app
        new webpack.optimize.OccurenceOrderPlugin(),

        // This plugin prevents Webpack from creating chunks
        // that would be too small to be worth loading separately
        new webpack.optimize.MinChunkSizePlugin({
            minChunkSize: 51200, // ~50kb
        }),

        // This plugin minifies all the Javascript code of the final bundle
        new webpack.optimize.UglifyJsPlugin({
            mangle:   true,
            compress: {
                warnings: false, // Suppress uglification warnings
            },
        }),

        // This plugins defines various variables that we can set to false
        // in production to avoid code related to them from being compiled
        // in our final bundle
        new webpack.DefinePlugin({
            __SERVER__:      !production,
            __DEVELOPMENT__: !production,
            __DEVTOOLS__:    !production,
            'process.env':   {
                BABEL_ENV: JSON.stringify(process.env.NODE_ENV),
            },
        }),

    ]);
}
That’s the ones I use most but Webpack offers a lot more plugins you can use to fine-tune your modules and chunks. There are also several user-contributed plugins that can be found on NPM and that accomplish various things. Links to available plugins can be found at the end of this article.
Now another aspect of production assets is ideally you’d like your assets to be versioned. Now remember when we set output.filename to bundle.js? Well there are several variables you can actually use in that option, one of which is [hash] and corresponds to a hash of the contents of the final bundle, so let’s change our code. We also want our chunks to be versioned so we’ll add an output.chunkFilename which accomplishes the same things:
output: {
    path:          'builds',
    filename:      production ? '[name]-[hash].js' : 'bundle.js',
    chunkFilename: '[name]-[chunkhash].js',
    publicPath:    'builds/',
},
As we don’t really have a way to dynamically retrieve the name of the compiled bundle in our simplistic app, we’ll only version assets in production, for the example. We may also want to clean up our builds folder before a production build (to save some space) so let’s install a third-party plugin that does just that:
$ npm install clean-webpack-plugin --save-devAnd add it to our configuration:
var webpack     = require('webpack');
var CleanPlugin = require('clean-webpack-plugin');

// ...

if (production) {
    plugins = plugins.concat([

        // Cleanup the builds/ folder before
        // compiling our final assets
        new CleanPlugin('builds'),
Ok, we have already done some nifty optimizations, let’s compare the results:
$ webpack
                bundle.js   314 kB       0  [emitted]  main
1-21660ec268fe9de7776c.js  4.46 kB       1  [emitted]
2-fcc95abf34773e79afda.js  4.15 kB       2  [emitted]
$ NODE_ENV=production webpack
main-937cc23ccbf192c9edd6.js 97.2 kB 0 [emitted] mainSo what has Webpack done: first of all since our example is very lightweight, our two async chunks weren’t worth the HTTP request so Webpack merged them back up to the entry point. Second everything was properly minified. We went from a total of 3 HTTP requests for 322kb to a single HTTP request for 97kb.
But wasn’t the point of Webpack to stem away for one big ass JS file?
Yes, yes it is, but this only happened because our app is very small. Now consider this: you didn’t have to think about what to merge, when or where. If your chunks suddenly start having more dependencies, the chunk will be moved to an async chunk instead of being merged; and if these chunks start looking too similar to be worth loading separately, they would be merged, etc. You just setup the rules, and from then on, Webpack will automatically optimize your application in the best way possible. No manual labor, no thinking about what dependencies go where or are needed where, everything is automatic.

You may have noticed I didn’t setup anything to minify our HTML and CSS, that’s because the css-loader and html-loader already take care of that by default if the debug option we mentioned earlier is false. This is also the reason why Uglify is a separate plugin: because there is no js-loader in Webpack, since Webpack itself is the JS loader.
Extraction
Ok now as you may have noticed, since the beginning of this tutorial our styles have been injected live into the webpage which causes a FOUAP (Flash of Ugly Ass Page). Now wouldn’t it be nice if we could just, pipe all the styles that Webpack has gathered in the current build to a final CSS file? Sure we can, let’s call in some help from an external plugin:
$ npm install extract-text-webpack-plugin --save-devWhat this plugin does is exactly what I just said: gather a certain type of content from your final bundle, and pipe it elsewhere, most common use case being for CSS. So let’s set it up:
var webpack    = require('webpack');
var CleanPlugin = require('clean-webpack-plugin');
var ExtractPlugin = require('extract-text-webpack-plugin');
var production = process.env.NODE_ENV === 'production';

var plugins = [
    new ExtractPlugin('bundle.css'), // <=== where should content be piped
    new webpack.optimize.CommonsChunkPlugin({
        name:      'main', // Move dependencies to our main file
        children:  true, // Look for common dependencies in all children,
        minChunks: 2, // How many times a dependency must come up before being extracted
    }),
];

// ...

module.exports = {
    // ...
    plugins: plugins,
    module:  {
        loaders: [
            {
                test:   /.scss/,
                loader: ExtractPlugin.extract('style', 'css!sass'),
            },
            // ...
        ],
    }
};
Now the extract method takes two arguments: first is what to do with the extracted contents when we’re in a chunk ('style'), second is what to do when we’re in a main file ('css!sass'). Now if we’re in a chunk, we can’t just magically append our CSS to the generated one so we use the style loader here as before, but for all the styles that are found in the main file, pipe them to a builds/bundle.css file. Let’s test it out, let’s add a small main stylesheet for our application:
src/styles.scss
body {
  font-family: sans-serif;
  background: darken(white, 0.2);
}
src/index.js
import './styles.scss';

// Rest of our file
Let’s run Webpack and sure enough we now have a bundle.css file that we can import in our HTML:
$ webpack
                bundle.js    318 kB       0  [emitted]  main
1-a110b2d7814eb963b0b5.js   4.43 kB       1  [emitted]
2-03eb25b4d6b52a50eb89.js    4.1 kB       2  [emitted]
               bundle.css  59 bytes       0  [emitted]  main
If you’d like to also extract the styles of the chunks, you can pass the ExtractTextPlugin('bundle.css', {allChunks: true}) option. Do note that you can also use variables here in your filename, so if you wanted a versioned stylesheet you’d just do ExtractTextPlugin('[name]-[hash].css') same as for the Javascript file.
Images all the people
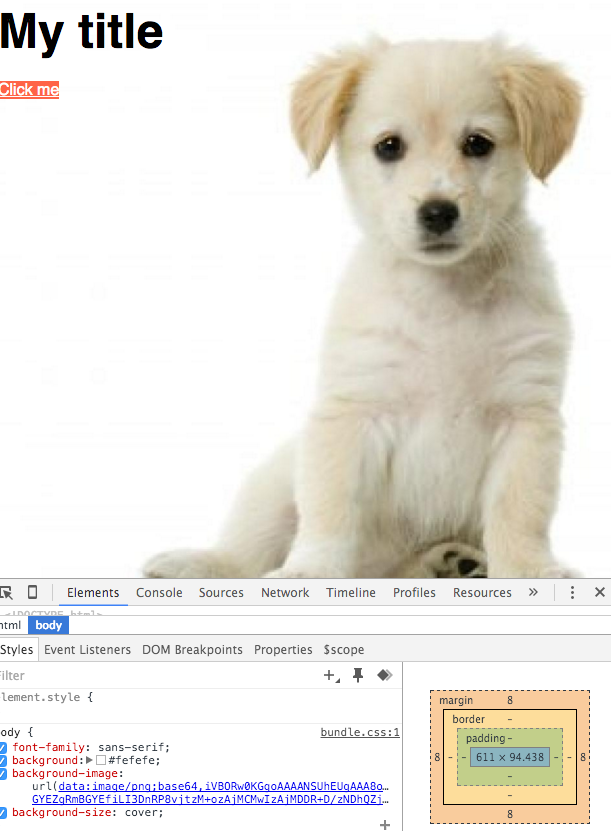
Now this is good for all our Javascript files but one topic we haven’t talked about much is concrete assets: images, fonts, etc. How do those work in the context of Webpack and how can we best optimize them? Let’s take a picture from the web that we’ll use as our page background because I’ve seen people doing it on Geocities and it looks so cool:

Let’s save this image in img/puppy.jpg, and update our Sass file accordingly:
src/styles.scss
body {
    font-family: sans-serif;
    background: darken(white, 0.2);
    background-image: url('../img/puppy.jpg');
    background-size: cover;
}
Now if you do this, Webpack will legitimately tell you “What the fuck do I do with a JPG”, because we have no loader for it. There are two native loaders we can use to handle concrete assets: the file-loader and the url-loader:
- The first one will just return a URL to the asset without any particular change, allowing you in the process to version the file (this is the default behavior).
- The second one will inline the asset to a
data:image/jpeg;base64URL
In reality it’s not black and white: if your background is a 2Mb image you don’t want to inline that and it would be preferable to load it separately. If on the other hand it’s a small icon of 2kb it’s better to inline it and spare the HTTP request, so let’s setup both:
$ npm install url-loader file-loader --save-dev{
test: /.(png|gif|jpe?g|svg)$/i,
loader: 'url?limit=10000',
},Here, we’re passing a limit query parameter to the url-loader which tells it: if the asset is smaller than 10kb inline it, else, fallback to the file-loader and reference it. That syntax is called a query string, you use it to configure loaders, alternatively you can also configure loaders through an object:
{
    test:   /.(png|gif|jpe?g|svg)$/i,
    loader: 'url',
    query: {
      limit: 10000,
    }
}
Ok let’s give it a shot:
                bundle.js   15 kB       0  [emitted]  main
1-b8256867498f4be01fd7.js  317 kB       1  [emitted]
2-e1bc215a6b91d55a09aa.js  317 kB       2  [emitted]
               bundle.css  2.9 kB       0  [emitted]  main
As we can see there is no mention of a JPG because our puppy image is smaller than the configured size, it has been inlined. Which means if we visit our page we can bask in the gloriousness of our puppies overlords.
This is very powerful because it means Webpack will now intelligently optimize any concrete assets found depending on the ratio of size/HTTP requests. There are a good load of loaders you can pipe to push things even further, most common one being image-loader which will pass imagemin on all images before bundling them. It even has a ?bypassOnDebug query parameter which allows you to only do that on production. There are a lot of plugins like that, I encourage you to take a look at the list at the end of this article.
We’ll do it live dammit
Now that our production build is taken care of, let’s focus more on our local development. You may have noticed one big hole so far that usually comes up when mentioning build tools: live reloading: LiveReload, BrowserSync, whatever your cup of tea is. But having the whole page refresh that’s for suckers, let’s take it one step further with what is called hot module replacement or hot reload. It’s the idea that, since Webpack knows exactly the position of each module in our dependency tree, a change in it can be represented by simply patching that part of the tree with the new file. More clearly: your changes appear live on your screen without the page reloading.
In order for HMR to be used, we need a server from which the hot assets will be served. Webpack comes with a dev-server we can leverage for that, so let’s install it:
$ npm install webpack-dev-server --save-devNow to run the dev server, nothing simpler, just run the following command:
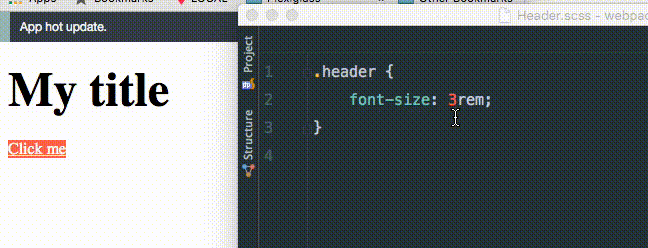
$ webpack-dev-server --inline --hotThe first flag tells Webpack to inline the HMR logic into the page (instead of presenting the page in an iframe) and the second enables HMR. Now let’s visit the web-server at http://localhost:8080/webpack-dev-server/. You’ll see your usual page, but now try to modify one of the Sass files and, magic:
You can use the webpack-dev-server as your own local server. If you plan to always use it for HMR, you can say so in your configuration:
output: {
    path:          'builds',
    filename:      production ? '[name]-[hash].js' : 'bundle.js',
    chunkFilename: '[name]-[chunkhash].js',
    publicPath:    'builds/',
},
devServer: {
    hot: true,
},
Now whenever we run webpack-dev-server it’ll already be in HMR mode. Note that we used webpack-dev-server here to serve the hot assets but you can use several other options, like an Express server. Webpack provides a middleware that you can use to plug in HMR capabilities to other servers.
Get clean or die lintin’
If you’ve been following this tutorial closely you may have noticed something weird: why are loaders nested in module.loaders but plugins are not? That’s because there are other things you can put into module of course! Webpack doesn’t just have loaders, it also has pre-loaders and post-loaders: loaders that are executed on the code before or after our main loaders. Let’s take an example: I’m sure the code I wrote for this article is horrendous, so let’s apply ESLint to our code before we transform it:
$ npm install eslint eslint-loader babel-eslint --save-devAnd let’s create a minimalistic .eslintrc file that I know will fail:
.eslintrc
parser: 'babel-eslint'
rules:
  quotes: 2
Now to add our pre-loader, we simply use the same syntax as before, but in module.preLoaders:
module:  {
    preLoaders: [
        {
            test: /.js/,
            loader: 'eslint',
        }
    ],
And now if we run Webpack, sure enough it fails:
$ webpack
Hash: 33cc307122f0a9608812
Version: webpack 1.12.2
Time: 1307ms
                    Asset      Size  Chunks             Chunk Names
                bundle.js    305 kB       0  [emitted]  main
1-551ae2634fda70fd8502.js    4.5 kB       1  [emitted]
2-999713ac2cd9c7cf079b.js   4.17 kB       2  [emitted]
               bundle.css  59 bytes       0  [emitted]  main
    + 15 hidden modules

ERROR in ./src/index.js

/Users/anahkiasen/Sites/webpack/src/index.js
   1:8   error  Strings must use doublequote  quotes
   4:31  error  Strings must use doublequote  quotes
   6:32  error  Strings must use doublequote  quotes
   7:35  error  Strings must use doublequote  quotes
   9:23  error  Strings must use doublequote  quotes
  14:31  error  Strings must use doublequote  quotes
  16:32  error  Strings must use doublequote  quotes
  18:29  error  Strings must use doublequote  quotes
Let’s take another example of pre-loader: for every component we currently import its stylesheet of the same name, and its template of the same name. Let’s use a pre-loader to automatically load any files bearing the same name as a module:
$ npm install baggage-loader --save-dev{
test: /.js/,
loader: 'baggage?[file].html=template&[file].scss',
}This tells Webpack: if you encounter an HTML file of the same name, import it as template, and also import any Sass file of the same name. We can now change our components from this:
import $ from 'jquery';
import template from './Button.html';
import Mustache from 'mustache';
import './Button.scss';
To this:
import $ from 'jquery';
import Mustache from 'mustache';
As you can see pre-loaders can be pretty powerful, same goes for post-loaders. Take a look at the list of available loaders at the end of this article and you’ll surely find a lot of use cases in it.
Would you like to know more?
Currently our application is rather small, but as it starts getting bigger it might be useful to be able to get more insights on what our actual dependency tree is. What we might be doing right or wrong, what are the bottlenecks of our application, etc. Now internally, Webpack knows all these things, but you have to ask him politely to show you what it knows. You can do so by generating a profile file by running the following command:
webpack --profile --json > stats.jsonThe first flag tells Webpack to generate a profile file, the second one to generate it in JSON, and finally we’re piping all this output to a JSON file. Now there are multiple websites to analyze these profile files, but Webpack provides an official one to decypher this information. So go to Webpack Analyze and import your JSON file there. Now go into the Modules tab and you should see a visual representation of your dependency tree:
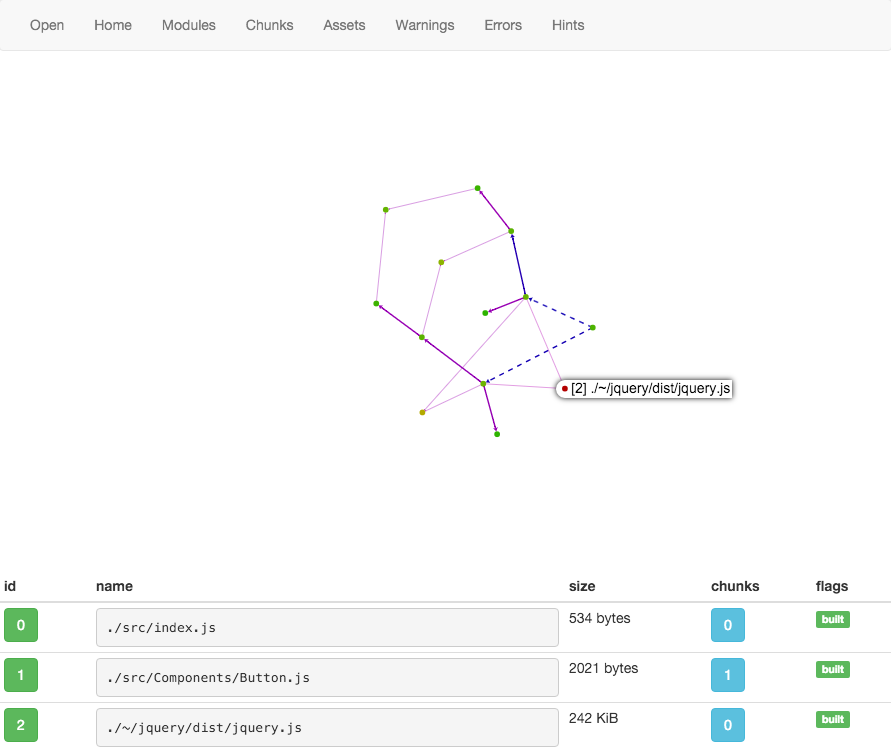
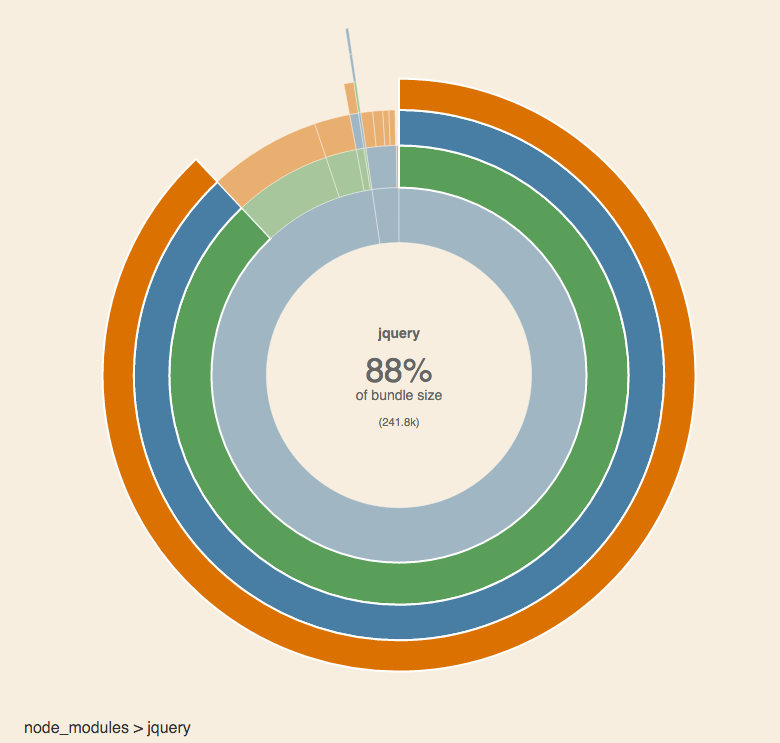
The redder a dot is, the more it is problematic regarding your final bundle. In our case it’s marking jQuery as problematic because it’s the heaviest of all our modules. Take a look into all the tabs, look around, you won’t learn much on our minimal application but this tool is a very important one to gain insight into your tree and final bundle. Now as I said, other services offer insight into your profile file, another one I like is Webpack Visualizer which spins up a doughnut chart of what takes up space in your bundle, which of course in our case:
That’s all folks
Now I know that in my case, Webpack has completely replaced Grunt or Gulp: most of what I used them for is now handled by it, and for the rest I just use NPM scripts. Per example one common task we had in the past was converting our API documentation to HTML with Aglio, this can easily be done like so:
package.json
{
  "scripts": {
    "build": "webpack",
    "build:api": "aglio -i docs/api/index.apib -o docs/api/index.html"
  }
}
If however you have more complex tasks in your Gulp stack that are unrelated to bundling or assets, Webpack plays very nicely with other build systems. Per example here is how to integrate Webpack in Gulp:
var gulp = require('gulp');
var gutil = require('gutil');
var webpack = require('webpack');
var config = require('./webpack.config');

gulp.task('default', function(callback) {
  webpack(config, function(error, stats) {
    if (error) throw new gutil.PluginError('webpack', error);
    gutil.log('[webpack]', stats.toString());

    callback();
  });
});
And that’s pretty much it, since Webpack also has a Node API, it can easily be used in other build systems, and in any case you’ll find wrappers for it hanging a bit everywhere.
Anyway, I think that’s a good enough bird’s eye view of what Webpack can do for you. You may think we have covered a lot in this article, but we have only scratched the surface: multiple entry points, prefetching, context replacement, etc. Webpack is an impressively powerful tool, which of course comes at the cost of a more opaque configuration syntax than your traditional build tool, I won’t deny it. But once you know how to tame it, it’ll purr the sweet sound of performance right into your ear. I used it on several projects, and it offers so much power of optimization and automation that I can’t honestly picture myself going back to banging my head on what assets is needed where or when.
Resources
- Webpack documentation
- List of loaders
- Sources for this article
- Our Webpack configuration package
- Introduction to Domain Driven Design
- Laravel 5 Command-Oriented Approach
- Laravel’s Ecosystem
- Makefiles for automation and better dev UI
- Typescript and Vue: Strongly Typed Props
- Performance tips for Laravel


Member discussion