About a year ago, I wrote about managing your ports with Traefik in your local development environment. That blog post described how to set up the Traefik proxy and route all your traffic to the correct container without having to rely on the ports exposed by your container.
This can be done for your http (and https) needs, but it’s also possible to have a similar setup for your database.
Let’s take the demo `docker-compose` file from the last blog post, but this time we’ll also add a MySQL database:
version: "3.8"

services:
  apache:
    image: httpd:2.4-alpine
    container_name: apache
    ports:
      - "80"
    labels:
      - "traefik.enable=true"
      - "traefik.http.routers.apache.rule=Host(`apache.docker`)"
      - "traefik.http.routers.apache.entrypoints=web"
      - "traefik.port=80"
    networks:
      - proxy

  database:
    image: mysql:latest
    container_name: mysql
    environment:
      - MYSQL_ROOT_PASSWORD=root
      - MYSQL_DATABASE=test
      - MYSQL_USER=test
      - MYSQL_PASSWORD=test
    ports:
      - "3306"

networks:
  proxy:
    external: true
After running docker-compose up, we end up with the following docker containers running:
CONTAINER ID   IMAGE                                COMMAND                  CREATED          STATUS          PORTS                                         NAMES
9a99e24681e8   httpd:2.4-alpine                     "httpd-foreground"       8 seconds ago    Up 7 seconds    0.0.0.0:53901->80/tcp                         apache
0bb272d37f00   mysql:latest                         "docker-entrypoint.s…"   8 seconds ago    Up 7 seconds    33060/tcp, 0.0.0.0:53900->3306/tcp            mysql
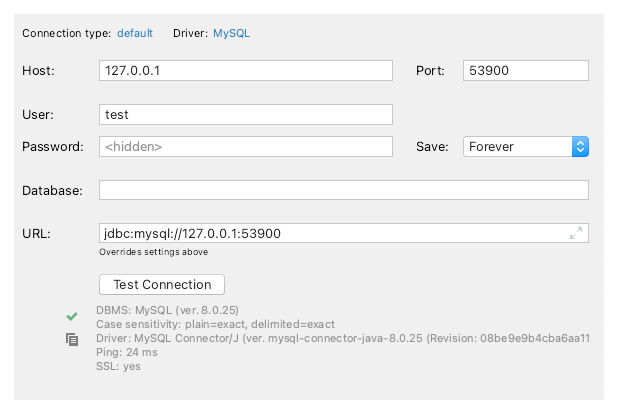
Hurray! We have a container with MySQL running and we can connect to it through port 53900.

So far, everything seems fine. But there is an annoyance luring around the corner.
Every now and then, we stop our containers and start them up again — perhaps daily — if we need to switch projects. Let’s restart our containers and take another look at the output of running docker-compose ps.
CONTAINER ID   IMAGE                                COMMAND                  CREATED          STATUS          PORTS                                         NAMES
2bb260f8969e   mysql:latest                         "docker-entrypoint.s…"   14 seconds ago   Up 13 seconds   33060/tcp, 0.0.0.0:54122->3306/tcp            mysql
9a99e24681e8   httpd:2.4-alpine                     "httpd-foreground"       10 minutes ago   Up 13 seconds   0.0.0.0:54123->80/tcp                         apache
Our MySQL container is running again. Only this time port 3306 is mapped to port 54122. Now we need to go to our database tool and change the connection settings before we can connect again.
That’s very annoying and we can do better!
Configure a Docker port for MySQL
Unfortunately, Traefik is not the optimal solution for us. There are some technical reasons why the setup used for http endpoints won’t work for MySQL. In short, Traefik won’t be able to determine the right container based on domain name.
This means we would still have to map each running database container to a specific port on the host machine. This is not a proper solution since we don’t want to bother with port management.
The solution here is to not use Traefik but to spin up a container next to our Traefik container which serves as an SSH tunnel. Here’s the updated docker-compose file for running Traefik:
version: "3"

services:

  proxy:
    restart: always
    image: traefik:v2.4
    container_name: traefik
    ports:
      - 80:80
      - 8080
    volumes:
      - /var/run/docker.sock:/var/run/docker.sock:ro
      - ./traefik.toml:/etc/traefik/traefik.toml
    labels:
      - traefik.enable=true
      - traefik.http.routers.api.rule=Host(`monitor.docker`)
      - traefik.http.routers.api.entrypoints=web
      - traefik.http.routers.api.service=api@internal
      - traefik.port=8080
    networks:
      - proxy

  sshtunnel:
    restart: always
    image: ghcr.io/linuxserver/openssh-server
    container_name: sshtunnel
    ports:
      - 2222:2222
    volumes:
      - ~/.ssh/id_rsa.pub:/etc/tunnel/id_rsa.pub
      - ./openssh/sshd_config:/config/ssh_host_keys/sshd_config
    environment:
      - PUBLIC_KEY_FILE=/etc/tunnel/id_rsa.pub
      - USER_NAME=proxy
      - SUDO_ACCESS=true
    networks:
      - proxy

networks:
  proxy:
    driver: bridge
    name: proxy
Let’s focus on the sshtunnel service we added. We are using the linuxserver/openssh-server image, which offers us some options to customize the service.
This image exposes port 2222 by default to connect with SSH and we will map this port to the same port on our host machine.
To properly connect to MySQL, we need to allow TCP forwarding. This can be done by overriding a setting in the sshd_config file. To override this setting, we’ll have to configure a volume to use our own sshd_config file.
volumes:

./openssh/sshd_config:/config/ssh_host_keys/sshd_config
Our own config file is just the default config file taken from the container, but with the AllowTcpForwarding setting changed. By default, this is set to ‘no’. Changing it to ‘yes’ could cause some security issues, but nothing to worry about in your development environment.
AllowTcpForwarding yesYou can find the full contents of the file in this gist.
Of course we want to make it easy to connect to this SSH tunnel. The container image makes it relatively easy for us to do so.
By using the PUBLIC_KEY_FILE parameter, we can add a public key to the authorized_keys file. So it’s just a matter of getting our own public key into the container. These are the parts of the `docker-compose` file that are needed.
volumes:
  - ~/.ssh/id_rsa.pub:/etc/tunnel/id_rsa.pub

environment:
  - PUBLIC_KEY_FILE=/etc/tunnel/id_rsa.pub
By default, the image provided uses linuxserver.io as the SSH username. In our example, I changed this to proxy, which is shorter and easier to remember
environment:
  - USER_NAME=proxy
Easily connect to MySQL via an SSH tunnel
After this, we’re finished setting up our SSH tunnel. All we need to do is make our database container easily reachable from the `sshtunnel` container. Docker-compose makes it possible to define domain aliases for each container. This will allow us to reach our database container using an alias as a hostname. The hostname we choose for this demo is test.mysql.docker.
database:
    image: mysql:latest
    container_name: mysql
    environment:
      - MYSQL_ROOT_PASSWORD=root
      - MYSQL_DATABASE=test
      - MYSQL_USER=test
      - MYSQL_PASSWORD=test
    networks:
      proxy:
        aliases:
          - test.mysql.docker
Note that we no longer need to explicitly expose port 3306. We don’t need to be able to reach our container directly from our host machine anymore and inside the proxy network, the container will be reachable on port 3306 anyway.
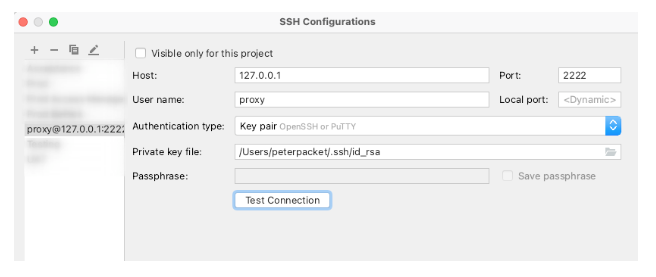
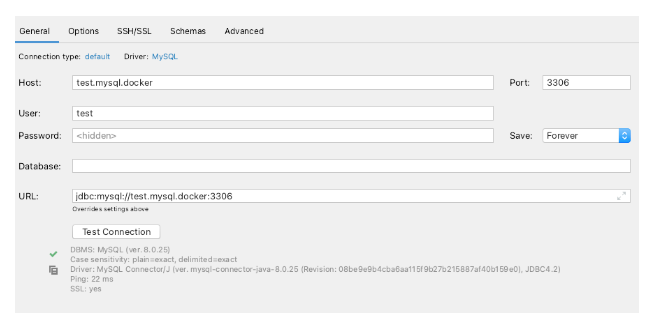
The only thing left to do now is set up our database tool to connect to the database using our newly created SSH tunnel. This is what it looks like in DataGrip.
Setting up the SSH connection:

Enabling the SSH tunnel:

And finally, connecting to the database with just the default port 3306:

This may seem like it involves some effort. But with this research done for you, the actual setup takes only a couple of minutes to configure. For me it took away a major annoyance and I’ve been a happier developer ever since.


Member discussion